FILM INTRODUCTION
|
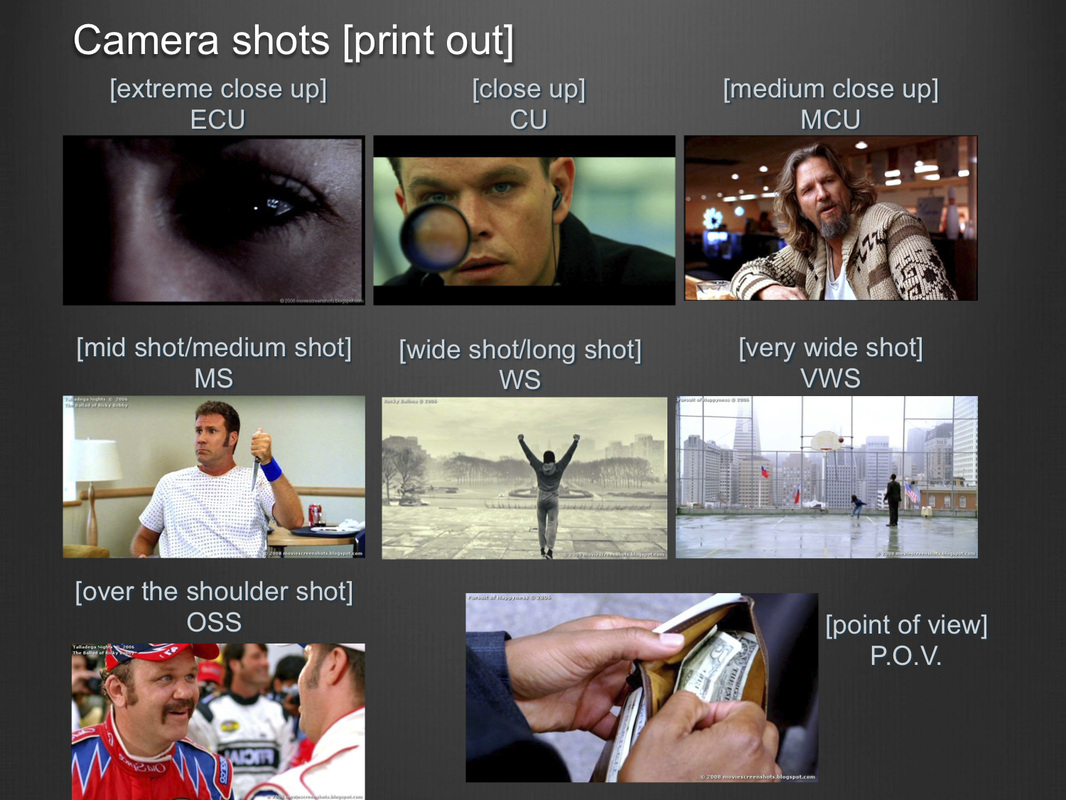
Film-making is storytelling. We use CAMERA SHOTS as tools and devices that help us tell our stories effectively. When using different camera shots think about WHY you are making that decision in how you tell your story. Camera shots that are closer up help show expression and emotion, while shots that are wider allow the audience to make a connection to the location and setting of that scene.
A camera shot is the amount of space that is seen in one shot or frame. Camera shots are used to demonstrate different aspects of a film's setting, characters and themes. As a result, camera shots are very important in shaping meaning in a film. Reviewing the examples on the right hand side of this page should make the different camera shots clearer. Camera shots are very important in shaping meaning in a film. Create a video clip montage in iMOVIE (on your phones) of the CAMERA SHOTS you learned in class. Each CAMERA SHOT clip should be no more than 5 seconds. Include a TITLE/LABEL on top of your clip. Use the RULE OF THIRDS. You will be using your phone to capture your video clips, turn on your camera/video app. Make sure you have good lighting as you film your shots. Autofocus lock onto the subject to ensure your subject is in focus and sharp. Film for 5 seconds. Once you have all your clips begin to upload your footage, start piecing it together on your iMovie or Final Cut Pro if you want to take the big leap.
WHAT YOU ARE DOING:
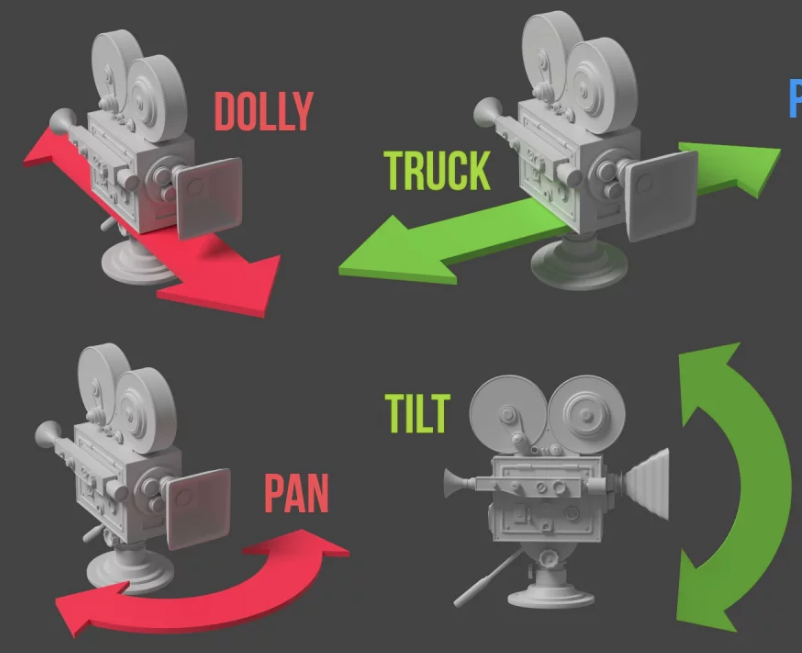
The objective of this project is to teach you how to use camera shots and movements to tell a story. Here are the themes and project ideas you can choose from:
| ||

- HOME
- OBEY CHOY
- Student Work
- THE LAB
- CREATIVITY
-
COURSES
-
MEDIA ARTS
>
- ANIMATION >
- ANIMATION >
- FILM CLASS >
-
PHOTOGRAPHY
>
- Photography Cheat Sheets
- ORGANIZING & SORTING PHOTOS
- CAMERA RAW- Editing
- Photography Assessment
- PHOTOGRAPHY BLOG
- PHOTO JOURNALISM >
- CHOOSE YOUR OWN ADVENTURE
- 1. LOW ANGLE > EYE LEVEL
- 2. LIGHT DRAWINGS
- 3. COMPOSITION HUNT
- 4. THIS IS ME- Knolling/Flat Lay
- 5. PORTRAIT LIGHTING
- 6. STREET PHOTOGRAPHY (Photo Walk)
- SHAPE & RULE OF THIRDS
- PHANTOM IMAGES
- HUMANS OF DELVIEW
- TYPOLOGIES
- LEADINGS LINES
- TRIPTYCH THEME PHOTOGRAPHY
- PHOTOWALK THEMES
- CREATIVE PERSPECTIVES
- F WORDS
- Elements & Principles of Art & Design
- PHOTO CONTEST
- YEARBOOK >
-
MEDIA ARTS
>
- TUTORIALS