
ANIMATION CLASS
WHAT YOU NEED FOR THIS COURSE
|
|
|
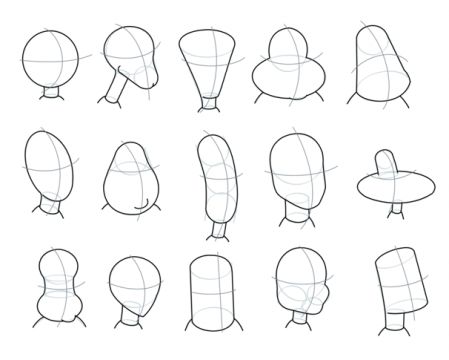
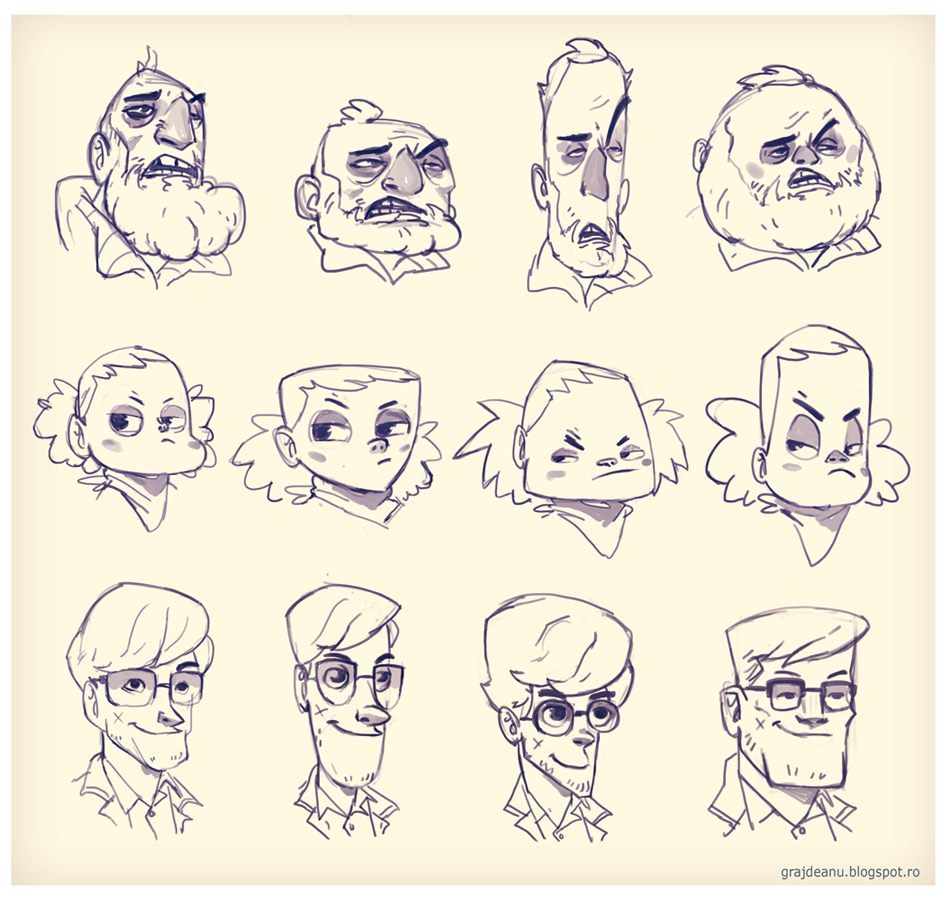
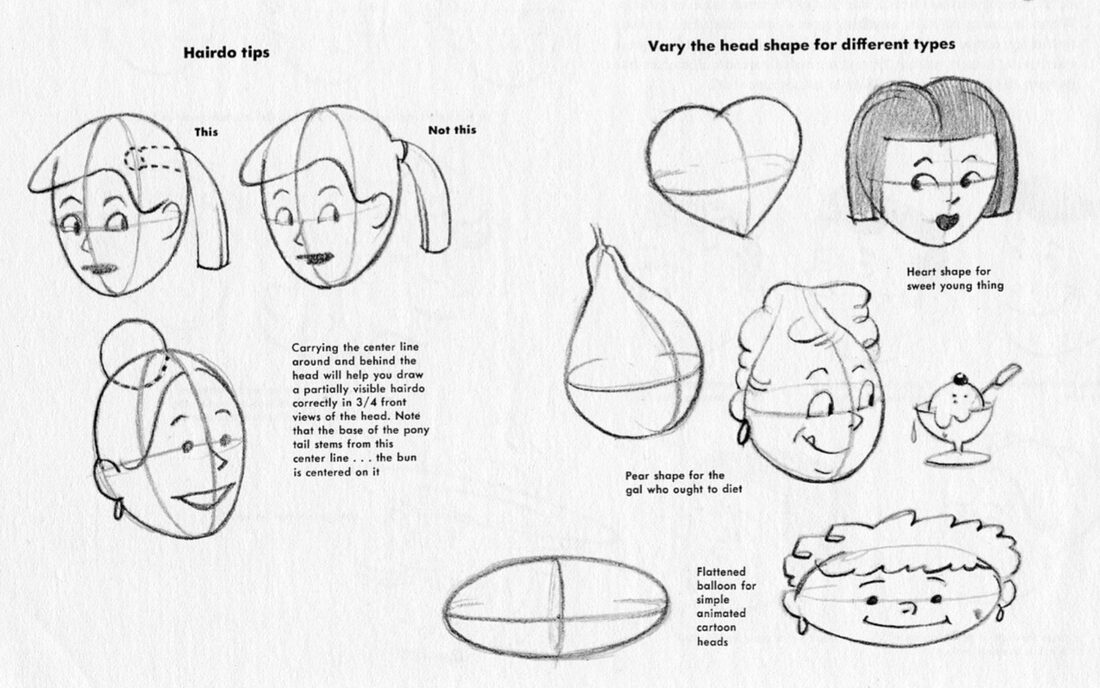
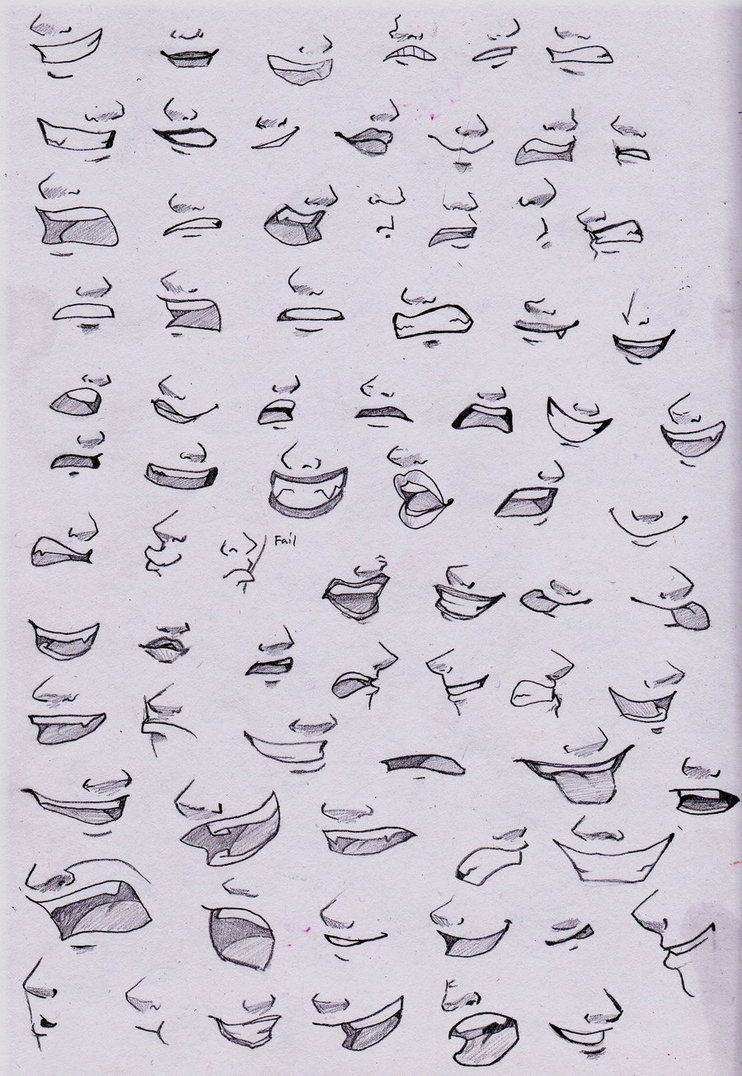
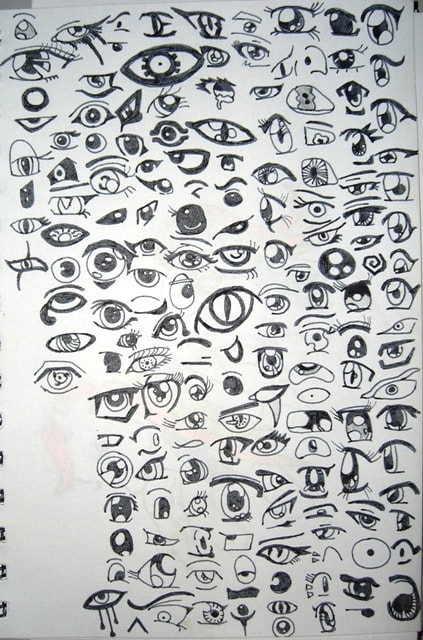
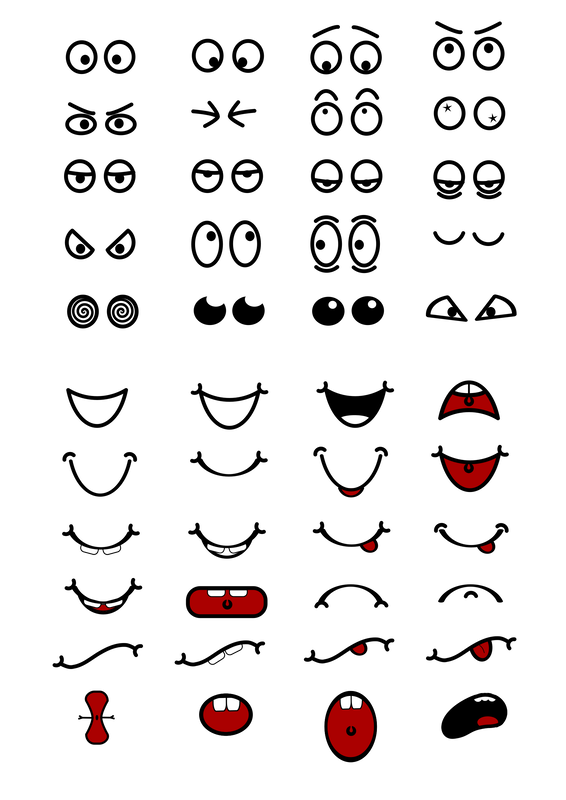
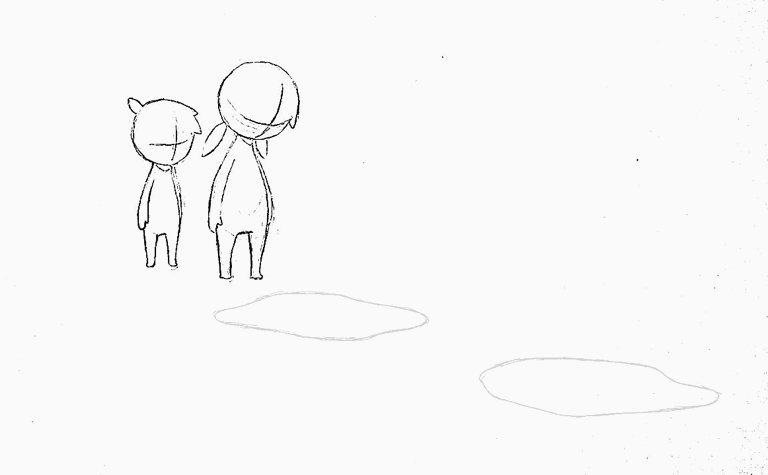
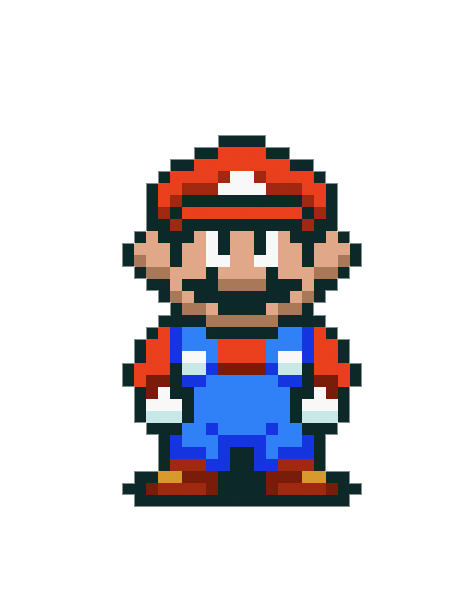
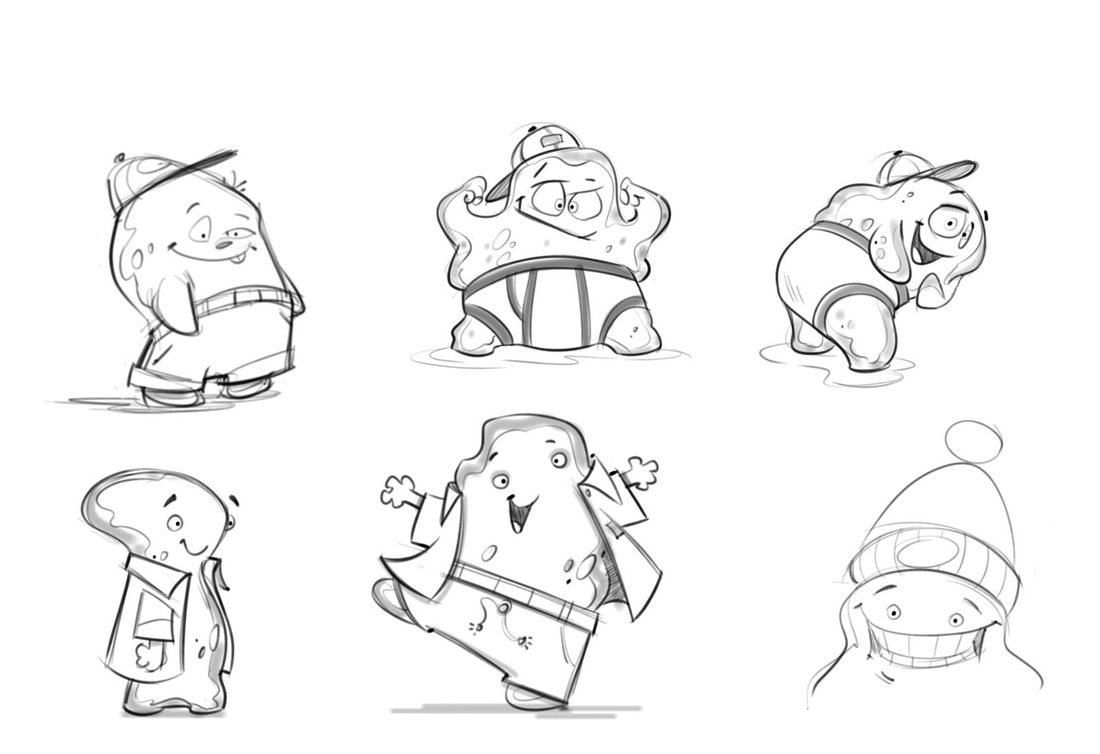
ANIMATIONCHALLENGE 1: CHARACTER HEADS
COMPLETION BY FEB 6
Draw a minimum of 5 different character faces for this challenge
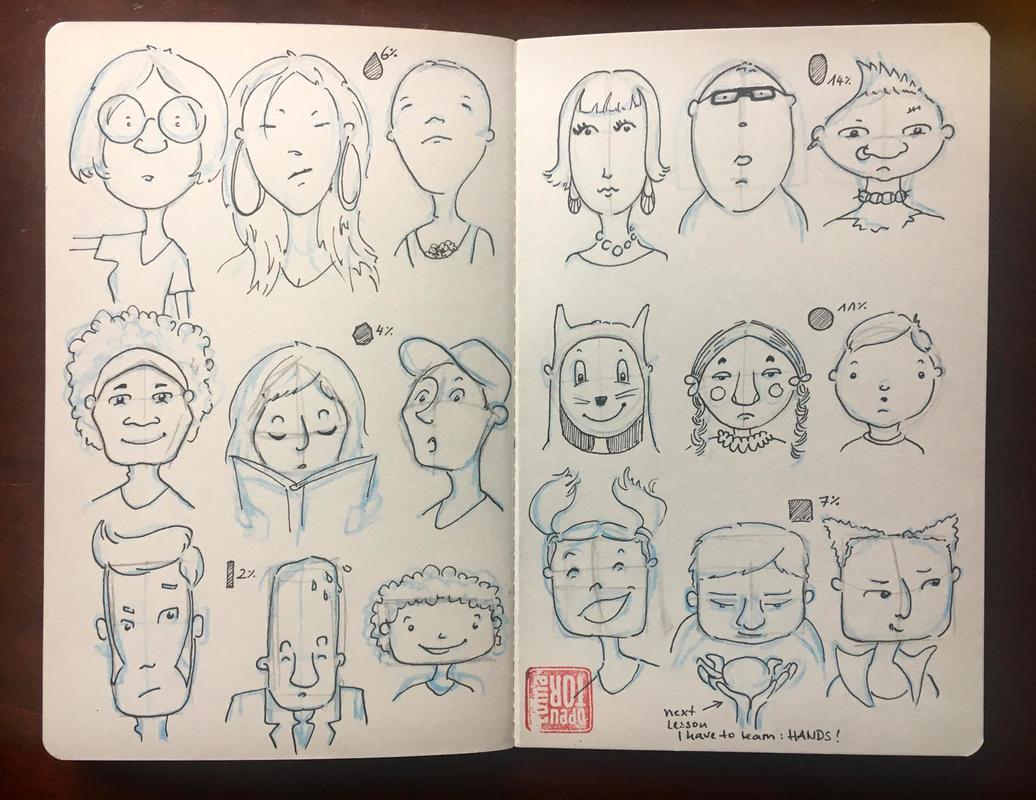
- KEEP ALL YOUR DRAWINGS, DON'T THROW ANYTHING OUT
- Drawings with pencil/pen and paper. No digital drawings.
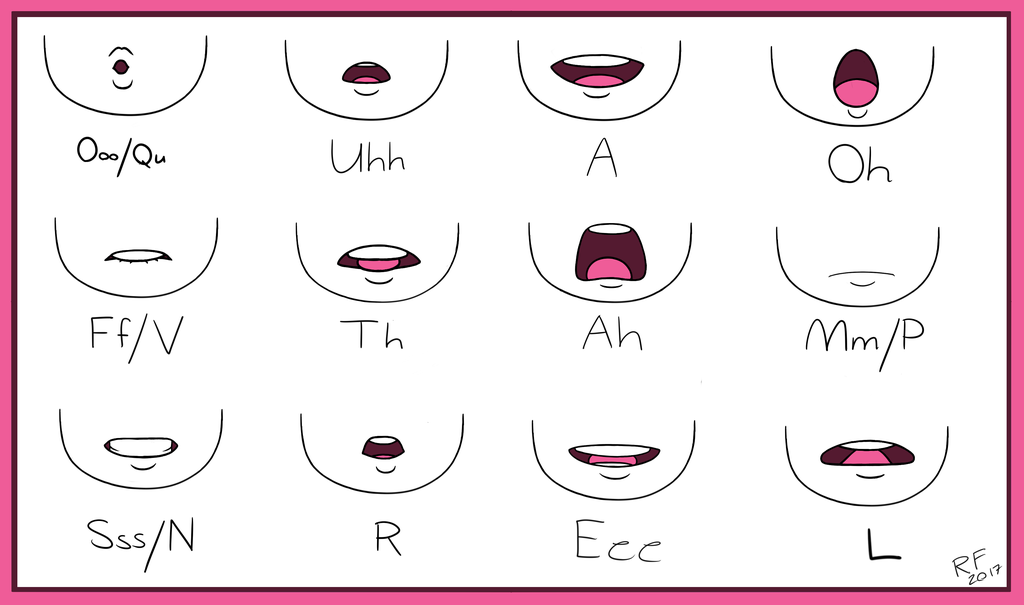
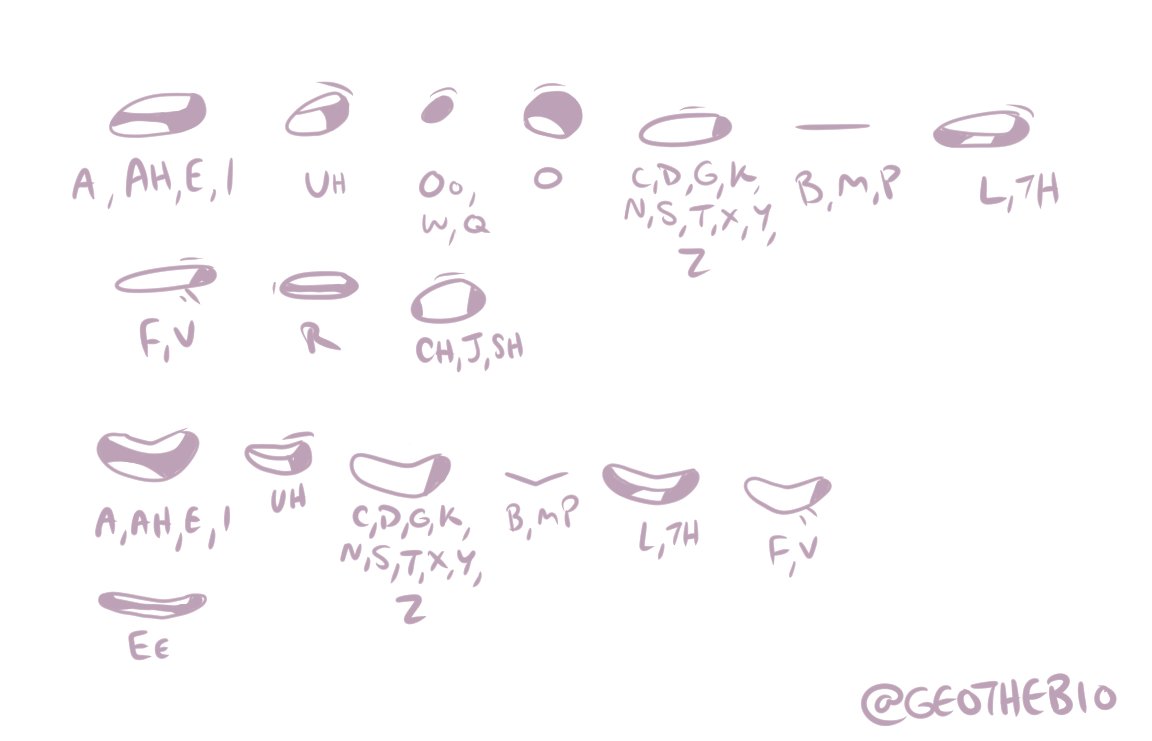
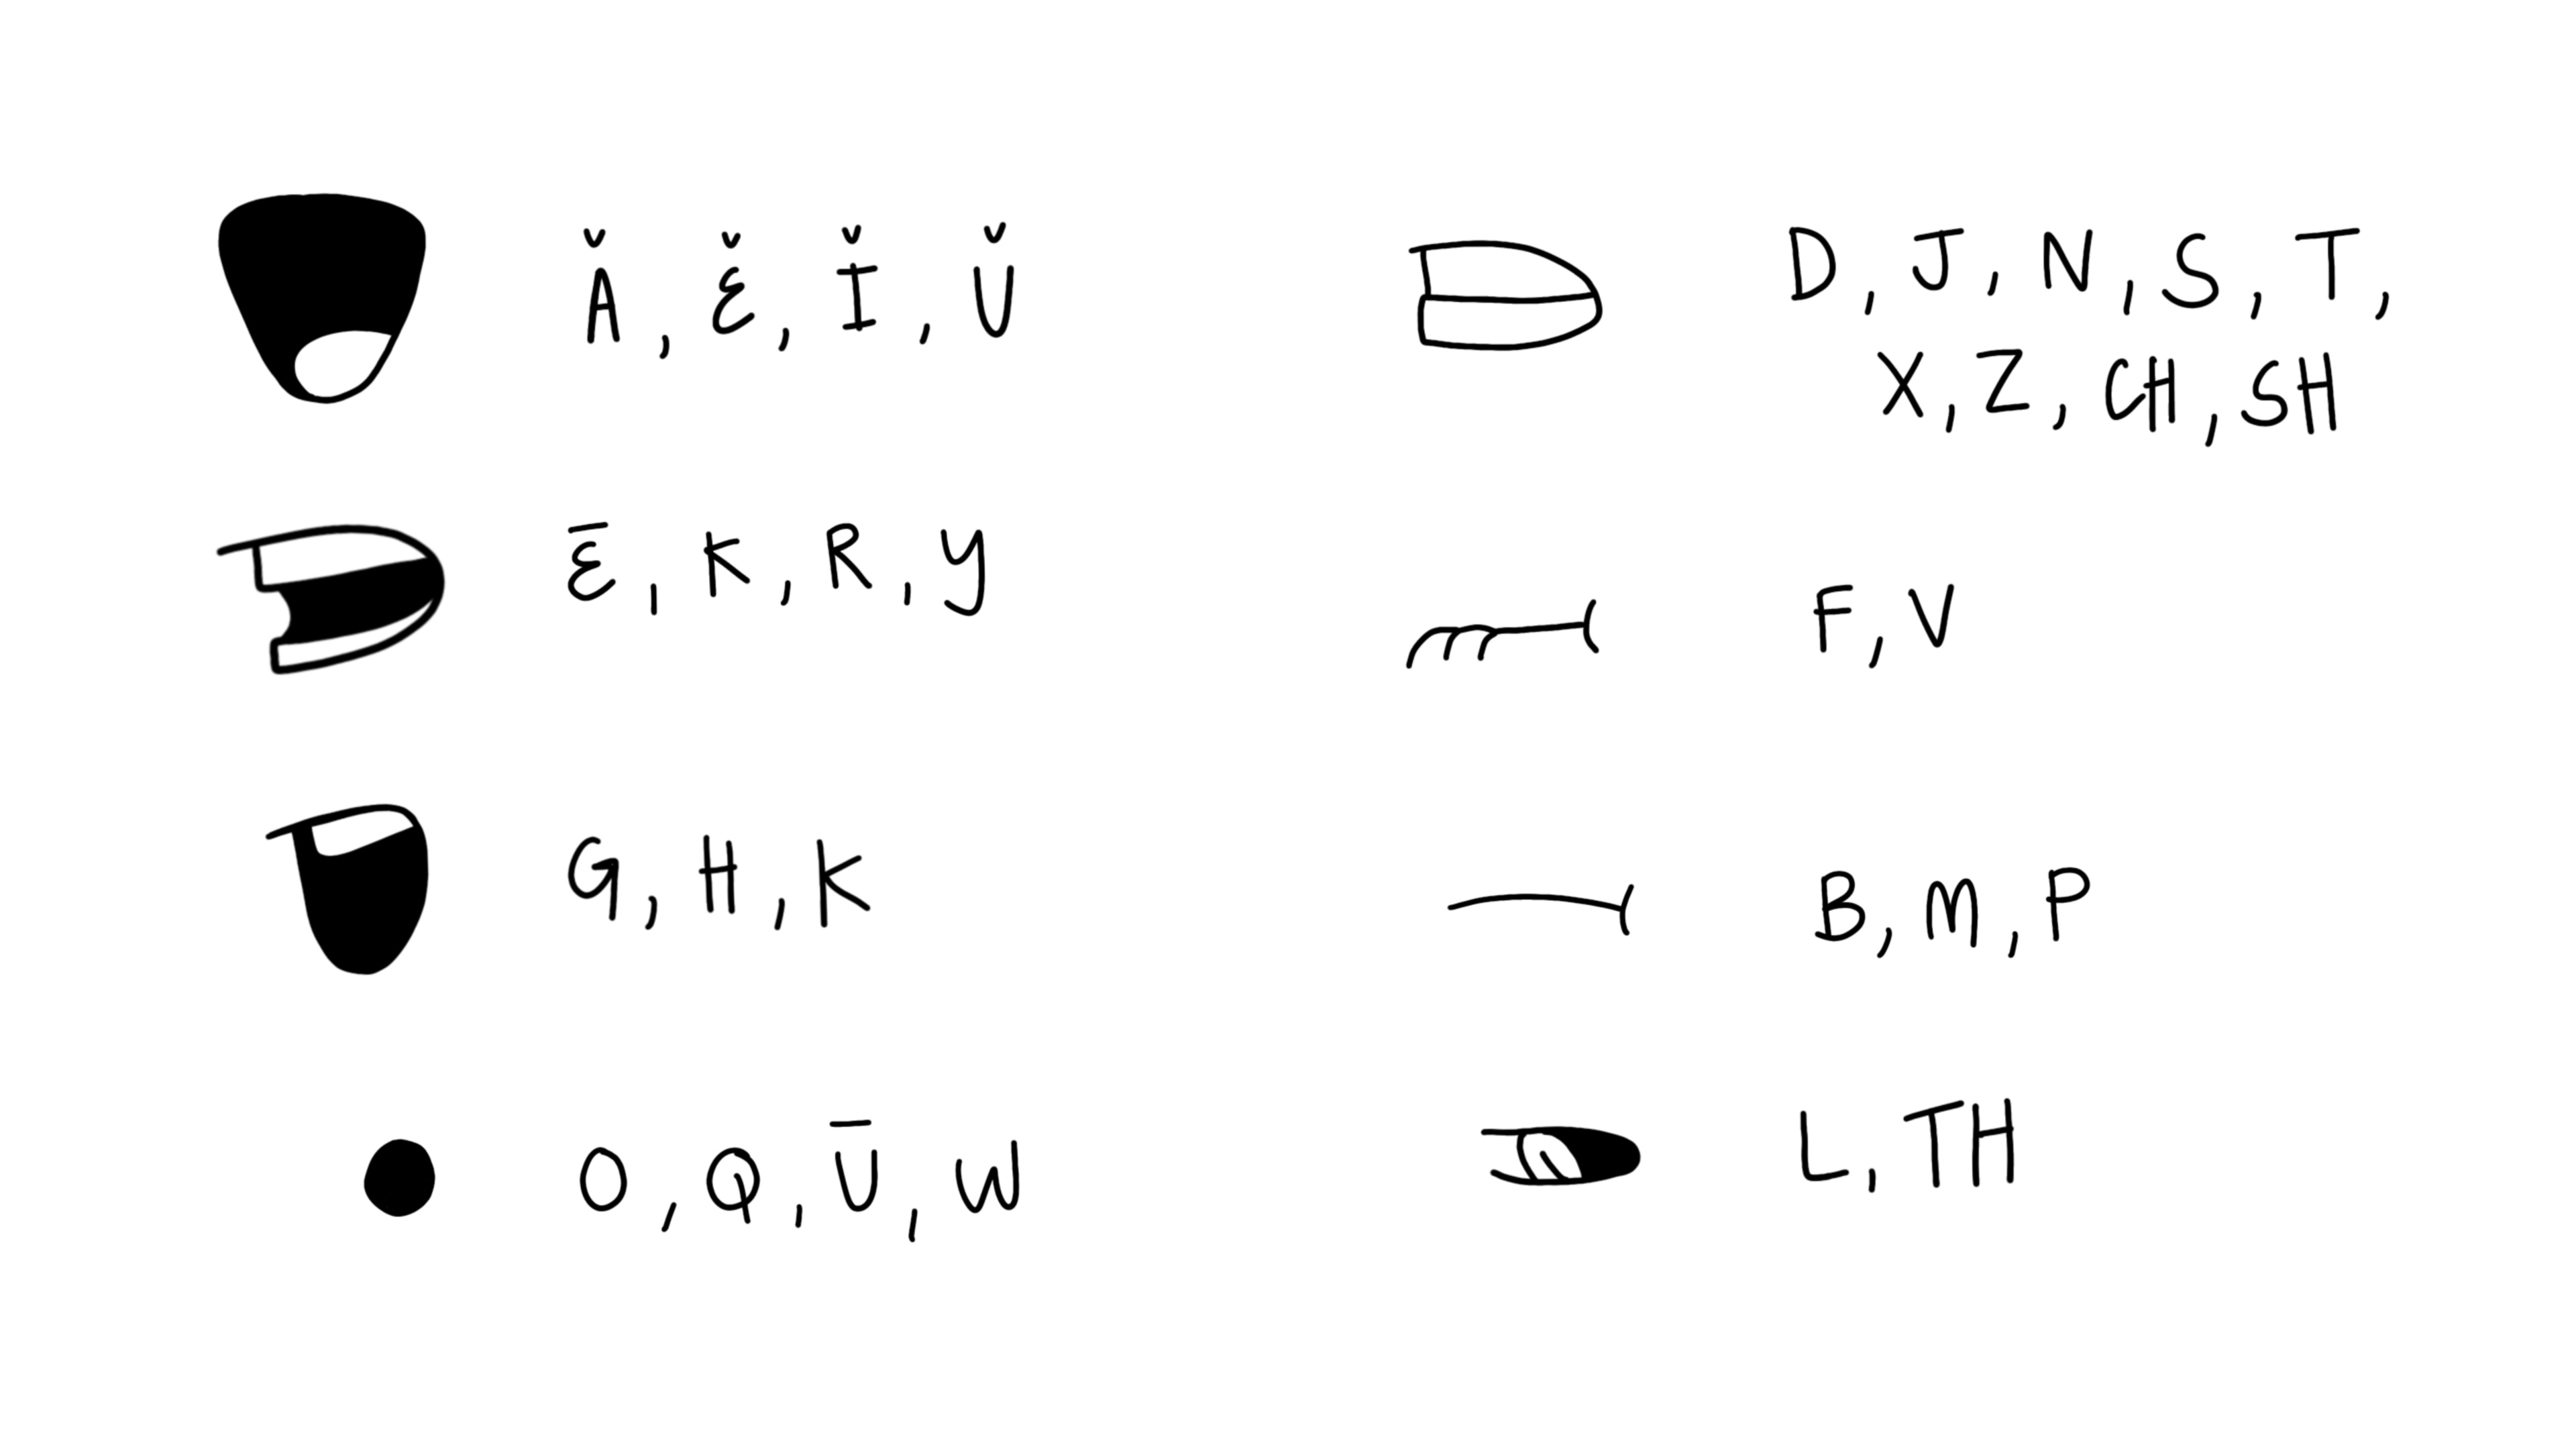
- Look at the various Mouth, Nose, and Eyes examples.
- Play around with different head shapes (circle, box, triangle, potato, oval)
- Your 5 different faces exhibit exploration and experimentation (each should use a different shape.
- EXAGGERATION
- Spend sometime creating doodles and draft sketches before finalizing your submission
- Show a variety of different characters.
- Use the tracing light boxes to help you redraw if needed
- Fine line and colour is your choice
- Scan you drawing and hand into Google Classroom


|
|
|
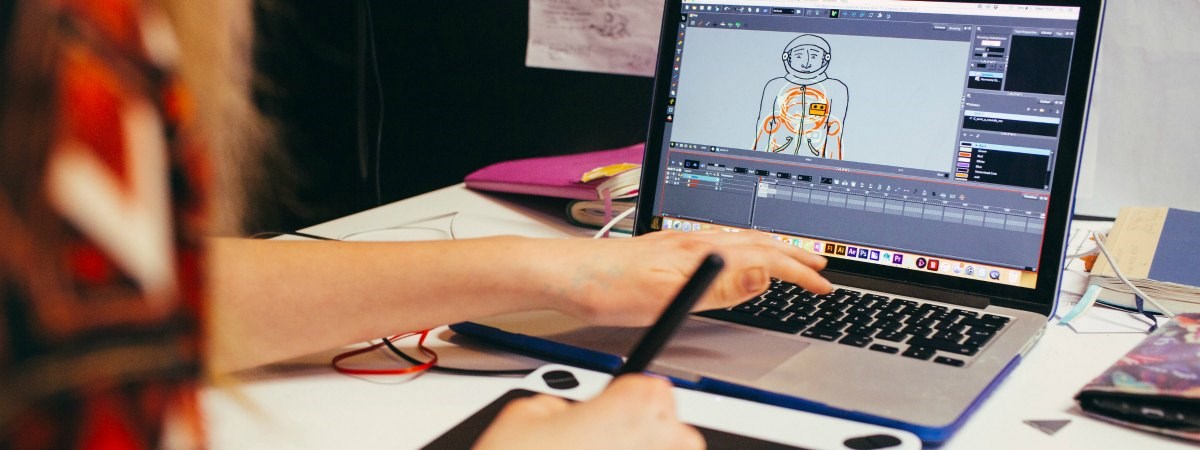
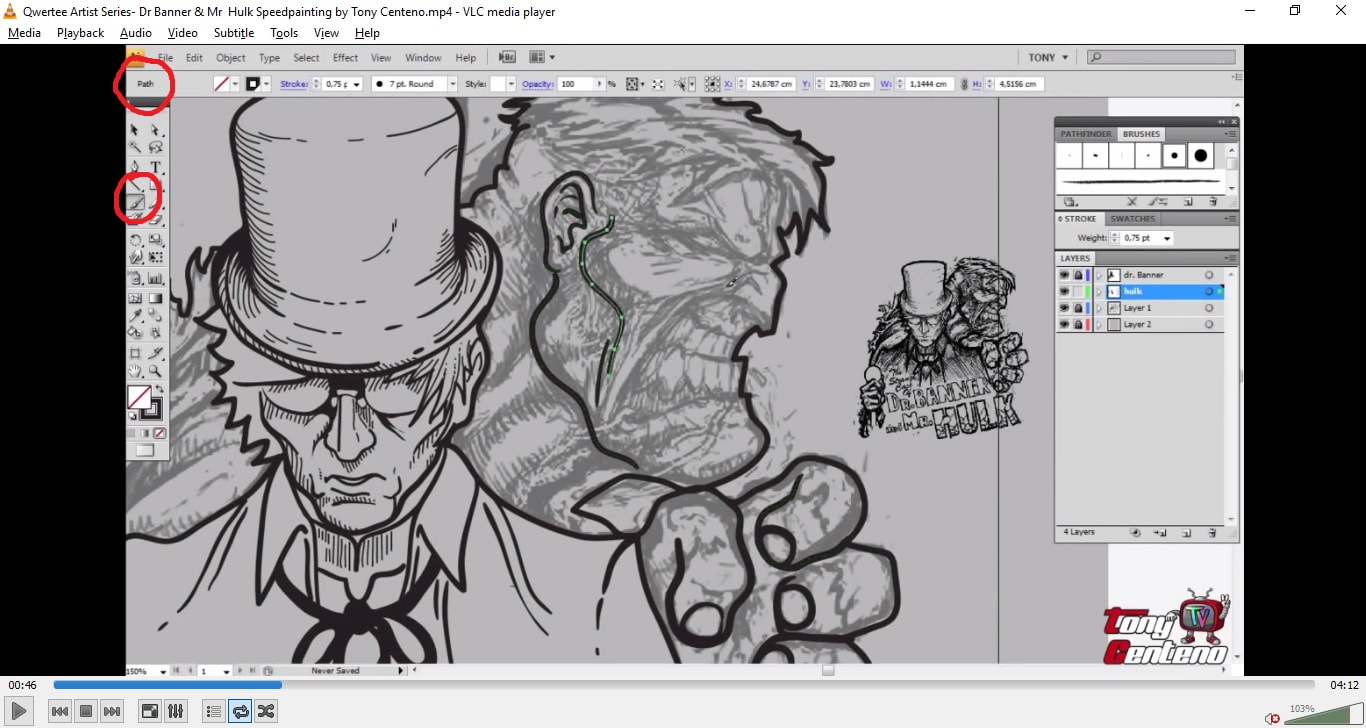
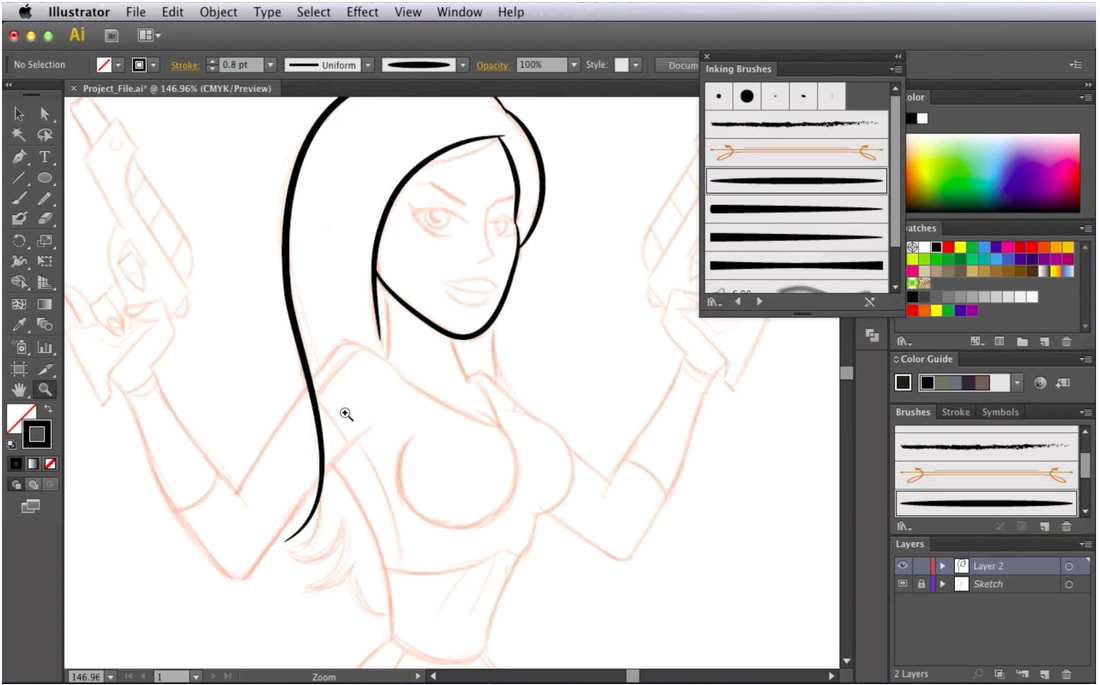
ANIMATIONCHALLENGE 2: FACE- ILLUSTRATOR BRUSHES
COMPLETION BY FEB...
Take 1 of your Animation Drawing faces to use as your digital brush exercise. You will take a photo or scan your pencil drawing. In Illustrator create 2 layers: BOTTOM LAYER- Sketch TOP LAYER- Digital Brush Trace. Using your choice of drawing brush style begin to trace out the outline of your drawing.
Shortcut for Brush is B
You can spend some time practicing and playing around with the brush tool before working on your final submission.
Shortcut for Brush is B
You can spend some time practicing and playing around with the brush tool before working on your final submission.
|
|
| ||||||
HOW TO: Save Illustrator Drawing as a JPEG
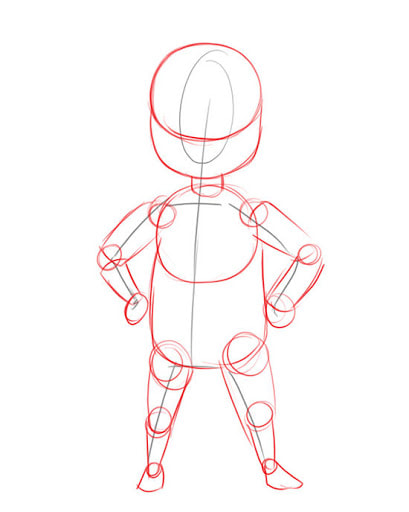
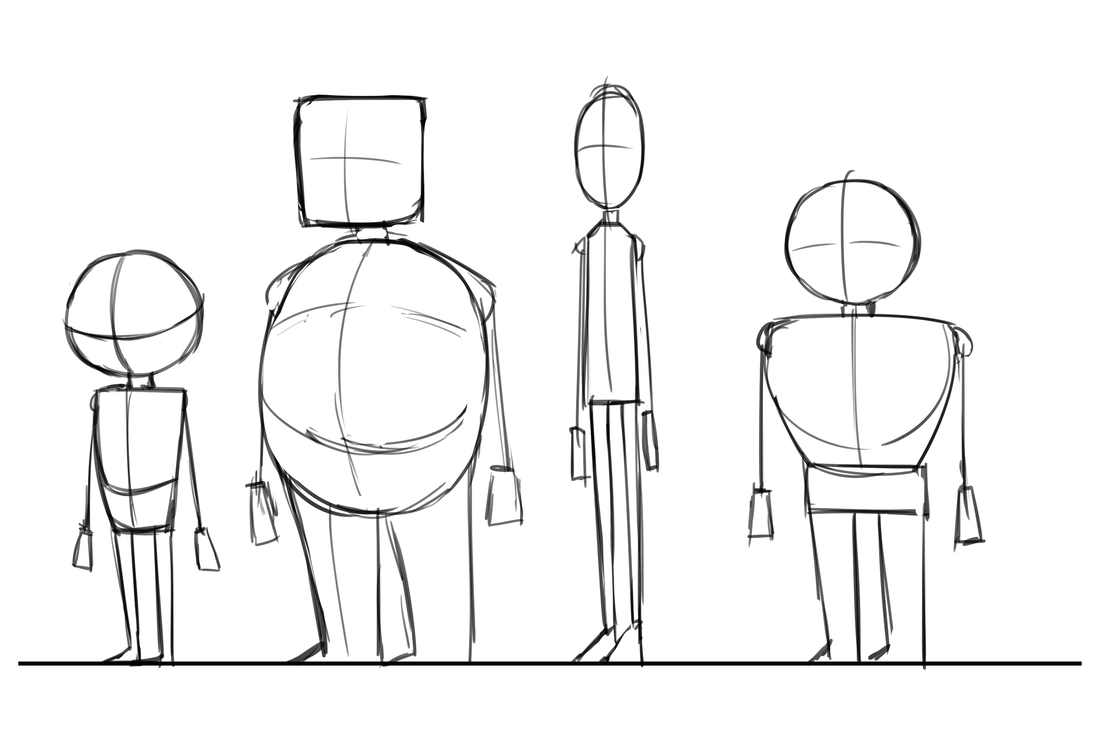
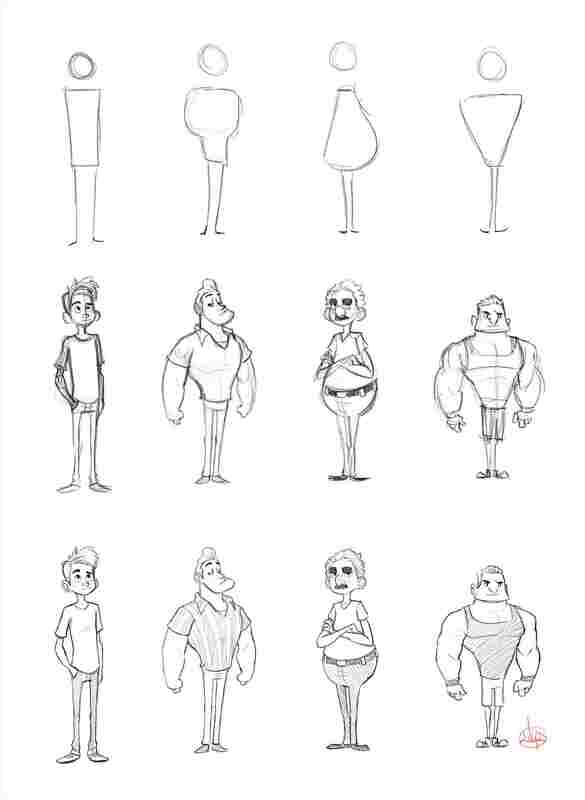
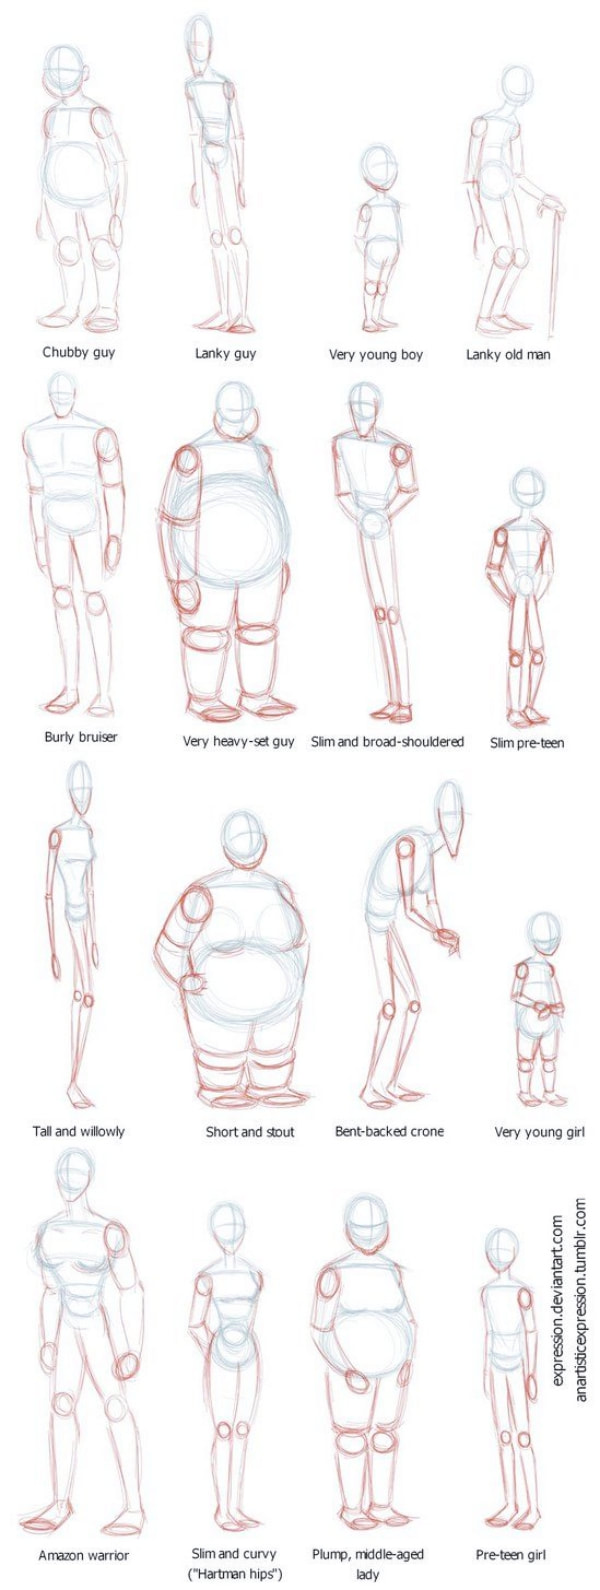
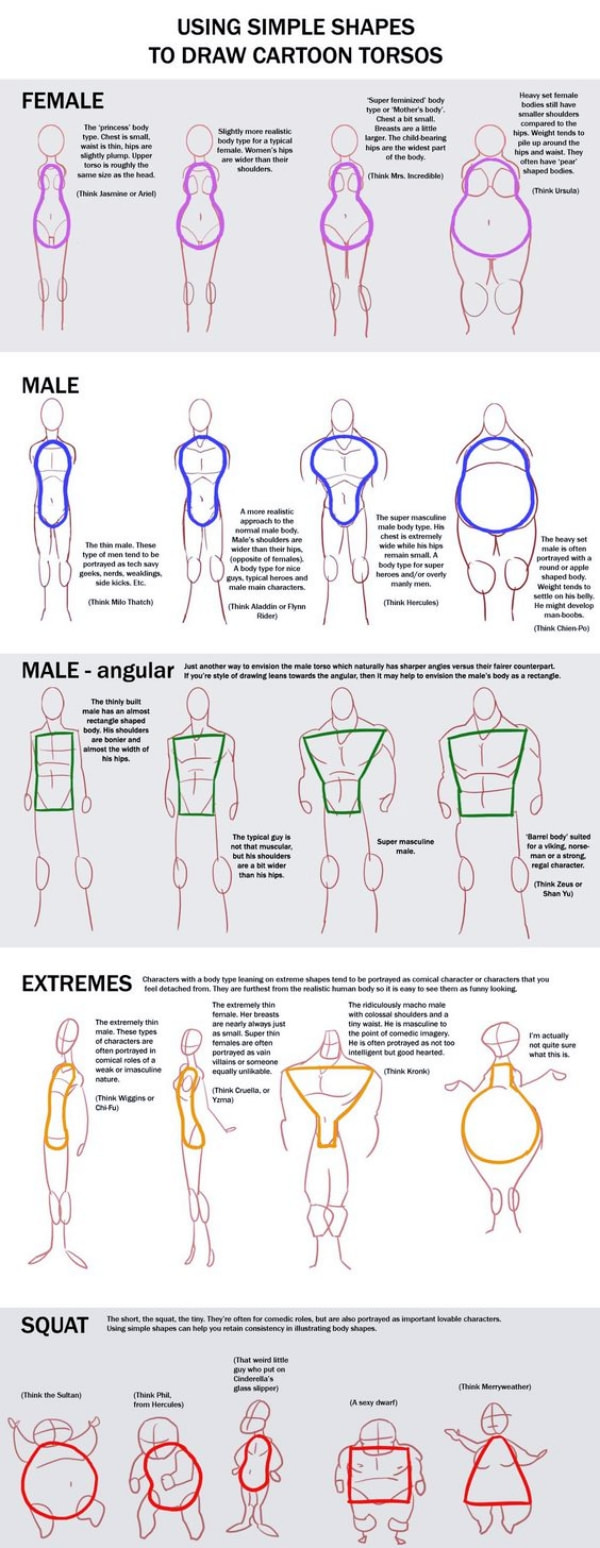
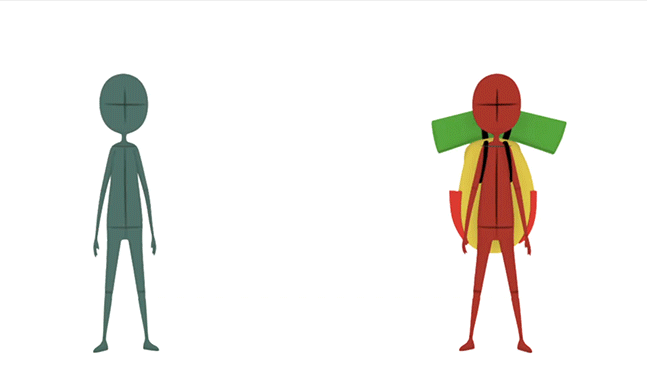
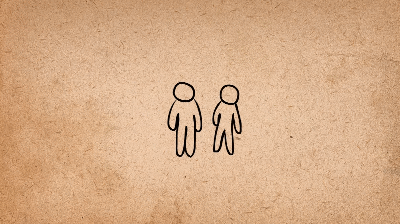
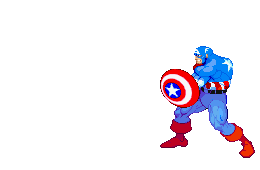
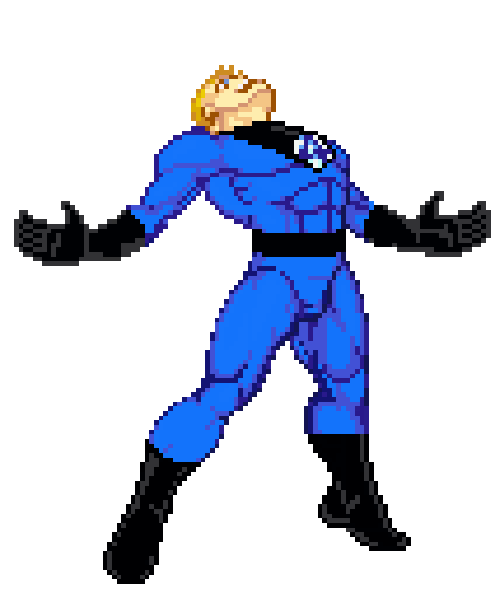
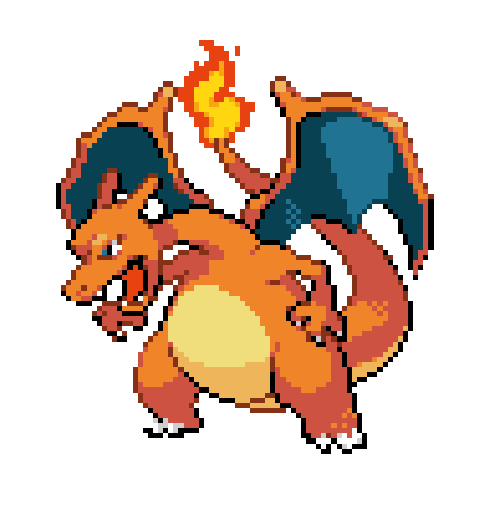
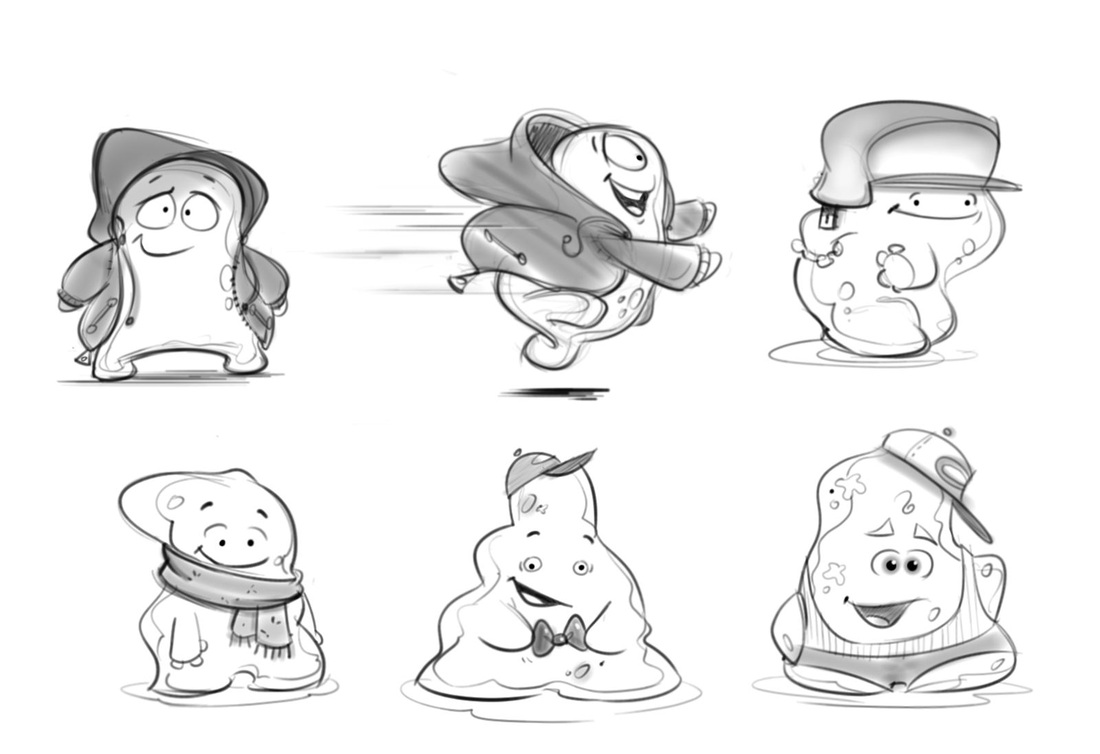
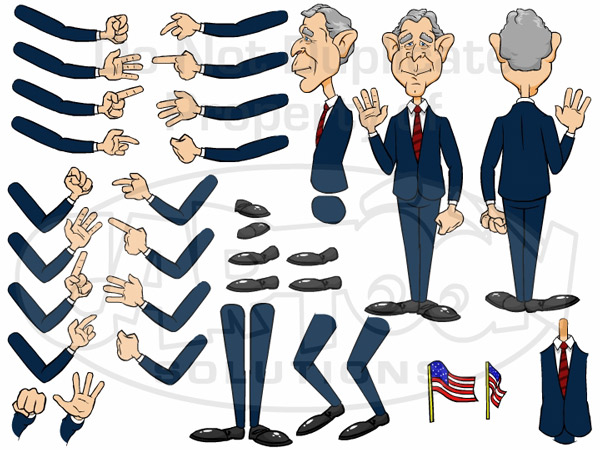
ANIMATIONCHALLENGE 3: CHARACTER BODIES
|
Create 5 animation bodies
|

|
|
|
|
|
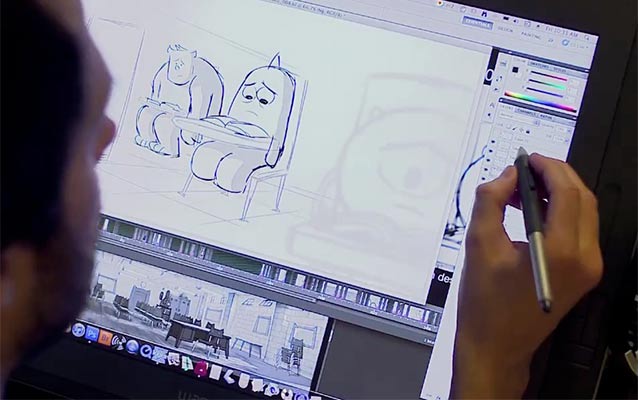
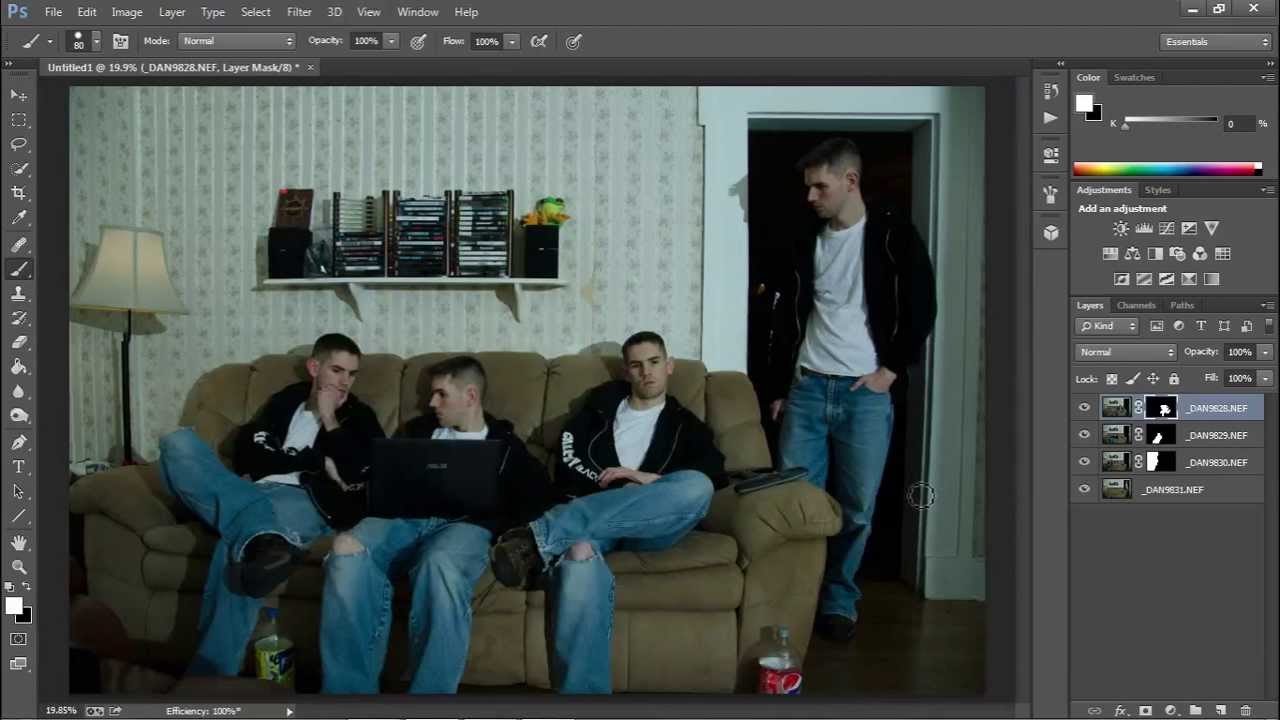
ANIMATIONCHALLENGE 4: ILLUSTRATING IN PHOTOSHOP
|
In this challenge we will begin to use our sketches and drawings in PHOTOSHOP.
There are a multitude of BRUSHES you can download from sites like BRUSHEEZY. Begin by drawing with pen or pencil on paper. Make sure the drawing is cleaned up and lines are dark enough to see. Scan your drawing and open it up in PHOTOSHOP.
|
| ||||||||||||
ANIMATIONCHALLENGE 5: LIP SYNC
|
|
|
|
|
Create an illustration in Illustrator or Photoshop of a character's head. You can use one of the existing heads that you created in the previous challenges.
Next, create a variety of mouth that you can use in Flash.
For audio, you can try and find an existing piece of dialogue from a movie, animated feature, or TV show.
Next, create a variety of mouth that you can use in Flash.
For audio, you can try and find an existing piece of dialogue from a movie, animated feature, or TV show.

ANIMATIONCHALLENGE 6: STRETCH & SQUASH

|
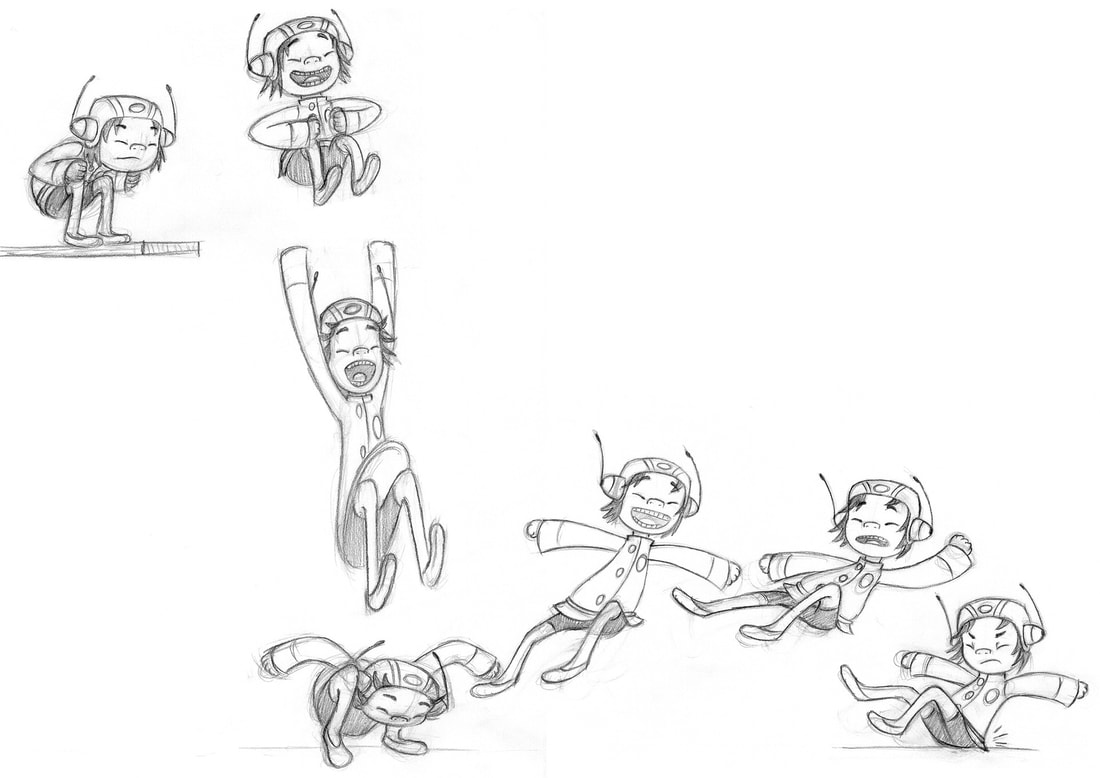
The most important animation principle is called squash and stretch. When an object moves, its movement indicates the rigidity of the object.
Squash and Stretch (S&S for short) is the principle of applying a contrasting change of shape—from a squash pose to a stretch pose or vice versa—to give a feeling of fleshiness, flexibility, and life in animation. The absence of squash and stretch gives a rigidity or stiffness to the motion. STEPS:
|


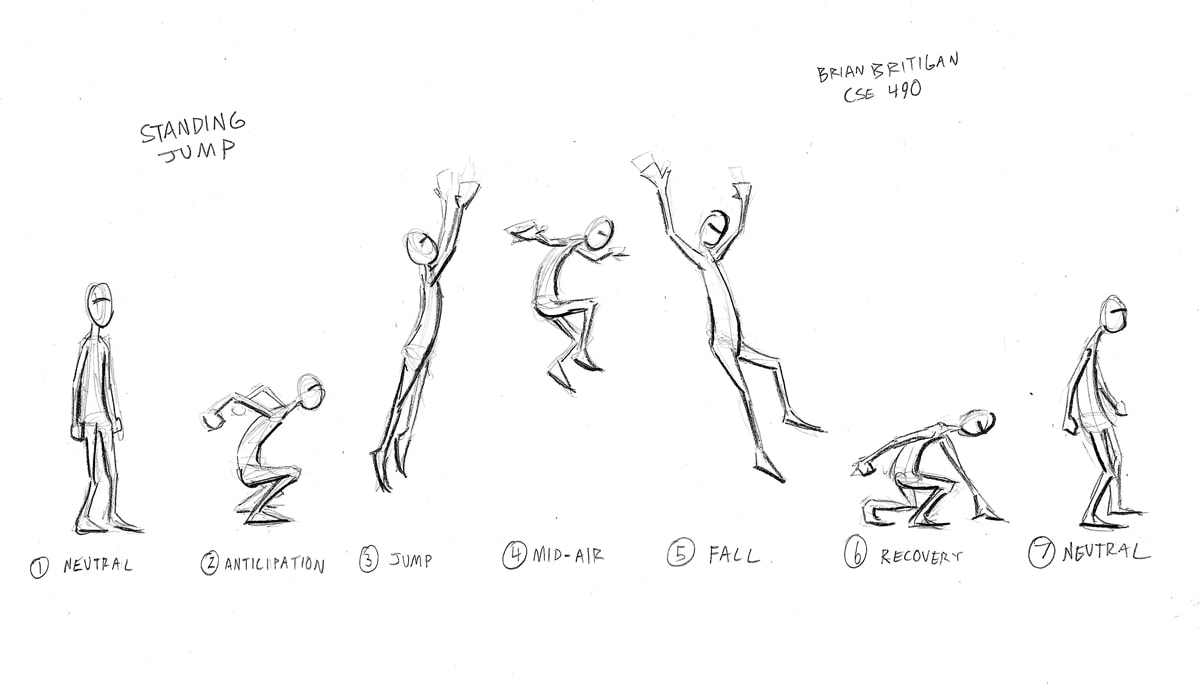
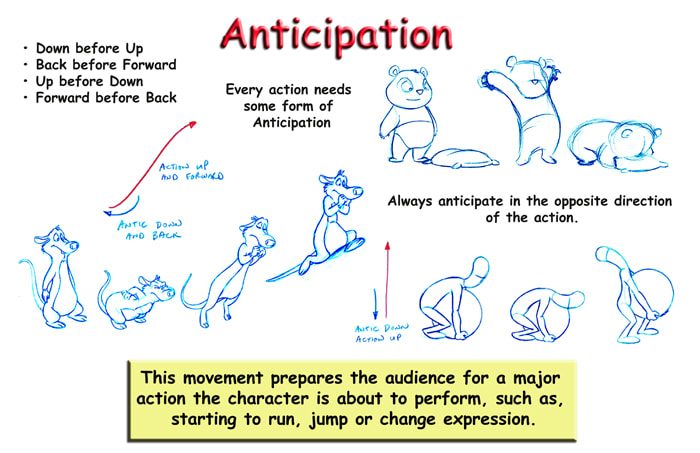
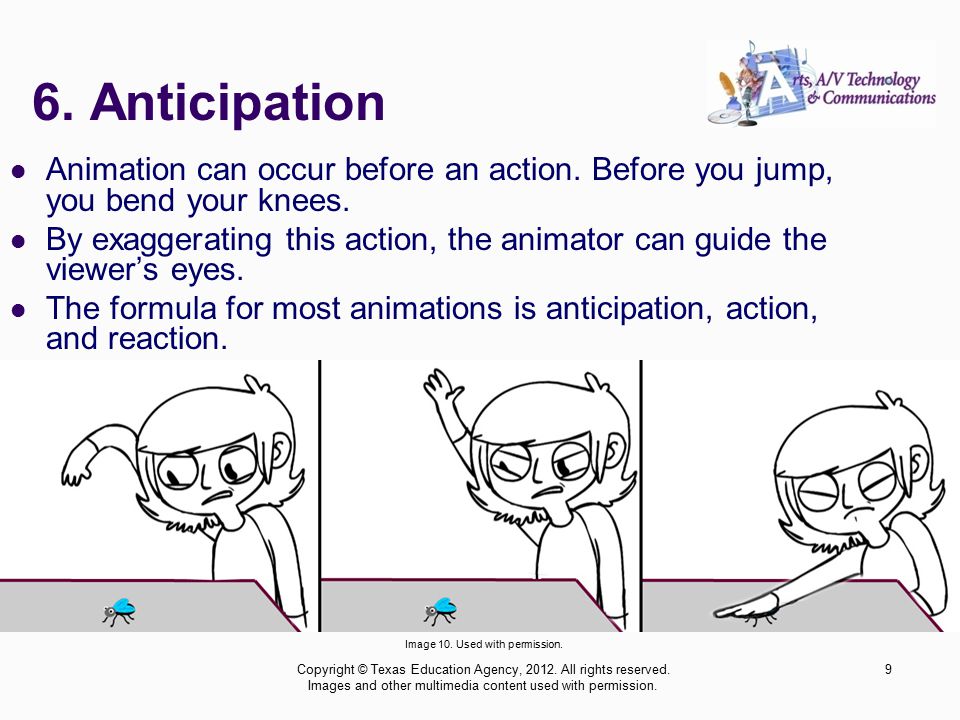
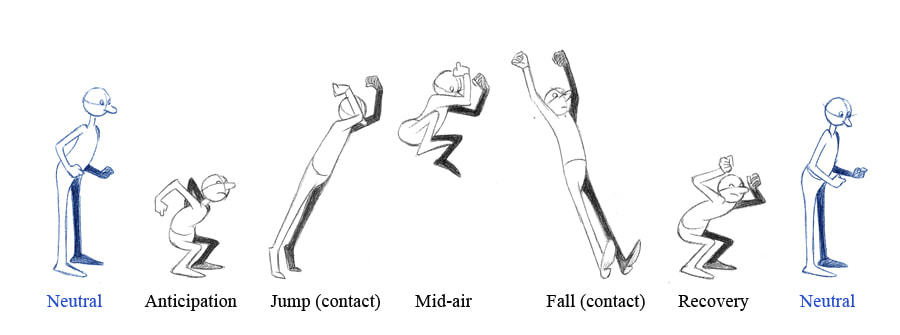
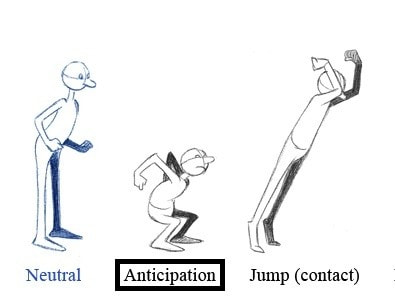
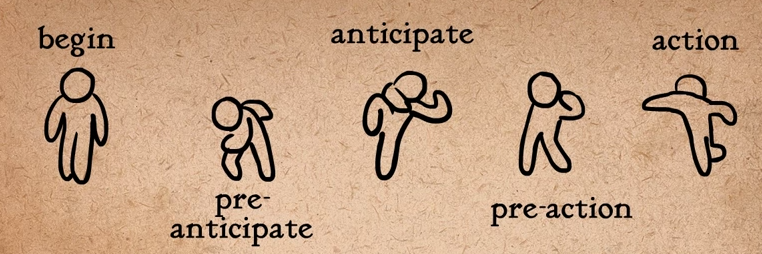
ANIMATIONCHALLENGE 7: ANTICIPATION
|
|
Anticipation is part of the Basic Principles of Animation. It’s often easy to forget it in our work as we can concentrate on making nice poses, timing, smooth motion, etc… but without it our animation can end up looking robotic.
Anticipation prepares the audience for a major action from the character. A simple example to demonstrate this is when a character is preparing to sprint forward, they may first move back slightly which conveys them building up momentum and preparing to sprint while also letting the audience anticipate their next action which is to sprint forward. Anticipation helps to set up believable actions as almost all real action has major or minor anticipation such as a diver about to leap off a diving board, or a boxer swinging a punch. Some examples of anticipation: • Entire body squashing down before jumping off a building • The heel of the foot pressing down before a step • Mouth compressing before opening to speak • An eye blink before a head turn As you can see from the list, the size of the anticipation does not matter. It can be broad or subtle. Create a series of pencil drawings that demonstrate the "ANTICIPATION" principle, hand this in as a photograph. Then use the same photograph and import it into ILLUSTRATOR or FLASH and clean it up. Then in FLASH set your drawings into motion. There should probably be a minimum of 8 drawings to create smooth motion. What are you handing in?
|


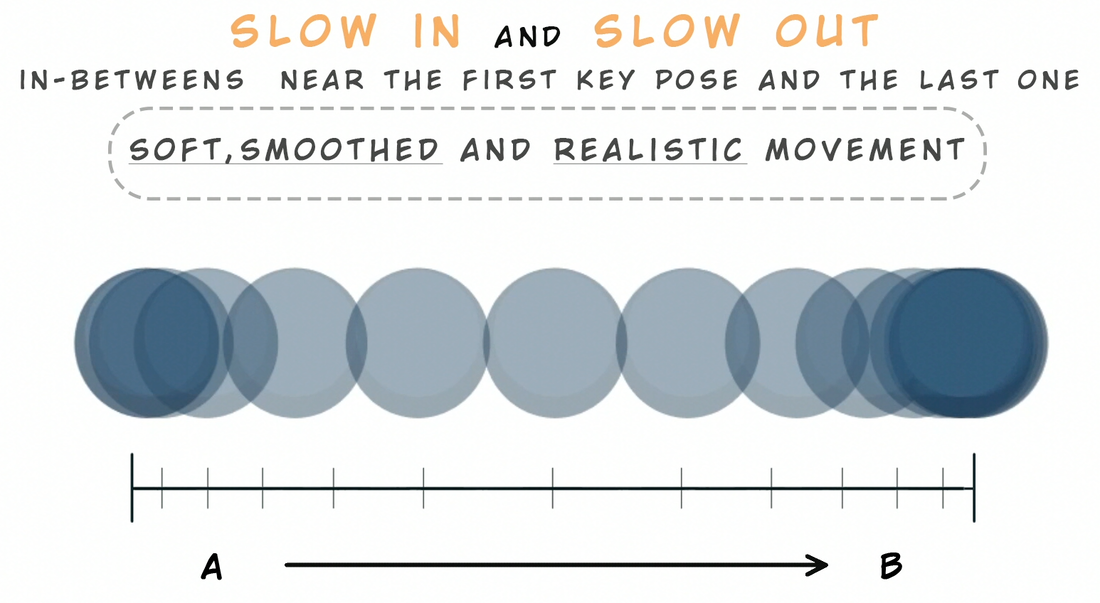
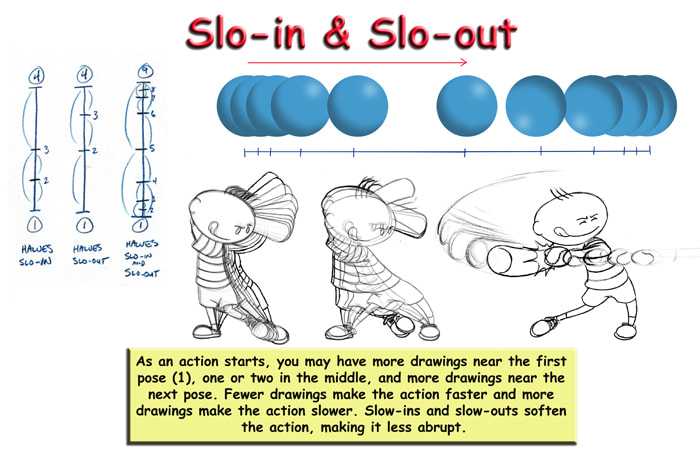
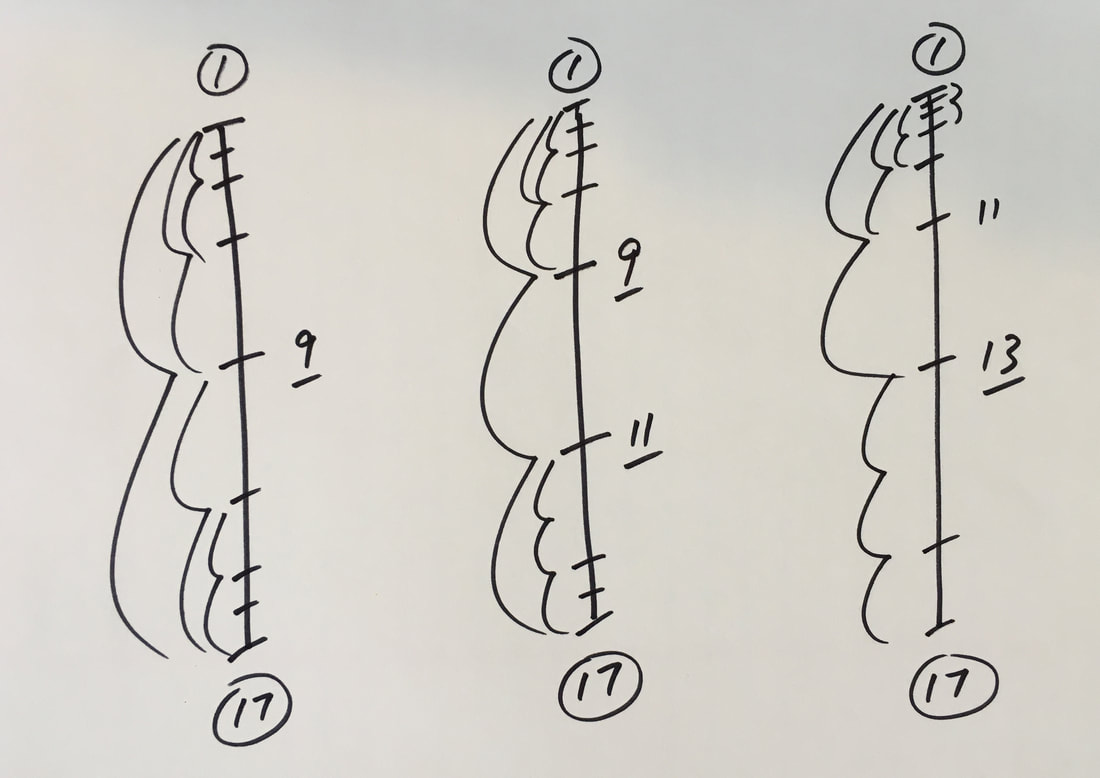
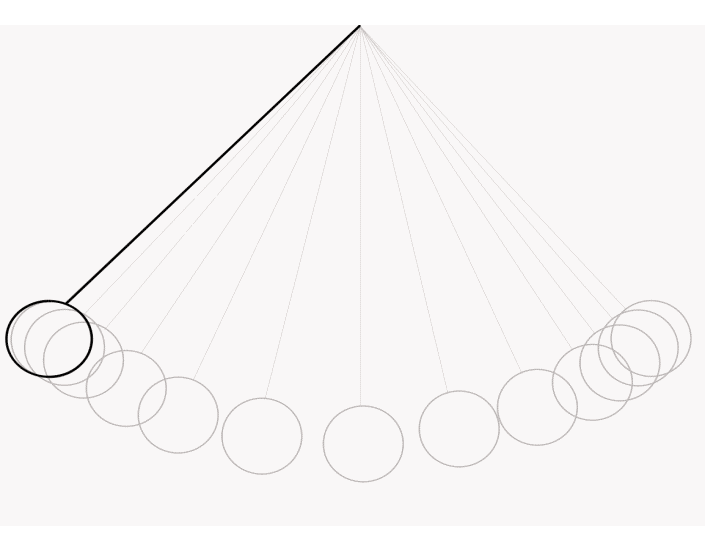
ANIMATIONCHALLENGE 8: SLOW IN & SLOW OUT
|
|
Can also be called Ease In and Ease Out.
This deals with the spacing of the in-between drawings between two extreme poses. Eases can be used to create acceleration and deceleration. Refers to the timing of an object or figure at the beginning or end of a sequence. ‘Slow In’- an action decelerates into a key frame meaning that the object will move slower. ‘Slow Out’- an action accelerates out of a key frame meaning that the object moves faster. Most actions will involve both a slow in and slow out to make the movement of the object look more realistic. Make a practice animation using a swinging ball. Map put the 2 extreme positions and fill in the in betweens. Create an animation sequence that uses the Principle of Slow in and Slow Out. Animated character should not be stick figures or "FLAT" looking. Your frames per second should be at 12 or 24. Not less than 12. What are you handing in?
|


ANIMATIONCHALLENGE 9: EXAGGERATION
|
|
Exaggeration is used in animation for visual effect. An action becomes a lot more interesting with exaggeration to make it look more extreme and surreal. It is the opposite of realism - if we were to animation a perfect imitation; it could look static and dull.
However the key to proper use of exaggeration lies in exploring the essence of the action or idea, understanding the reason for it, so that the audience will also understand it. If a character is sad, make him sadder; if he is bright, make him shine; worried, make him fret. |
FLASH CS3 TUTORIALS

|
Complete the following tutorials in ADOBE FLASH. These lessons will help you learn the program. We will be using ADOBE FLASH to create animations and bring our drawings to life.
Please follow the tutorials closely. Do not take short cuts because it will show when it comes time for you to animate. Also label your project files correctly (as given to you below). 1. MOTION TWEEN [save as: mtween_yourname.fla] 2. SHAPE TWEEN [save as: stween_yourname.fla] 3. MOTION GUIDE [save as: mguide_yourname.fla] 4. MASKING [save as: masking_yourname.fla] 5. WORKING WITH LAYERS [save as: layer_yourname.fla] 6. BLUR EFFECT [save as: blur_yourname.fla] 7. FADE IN FADE OUT [save as: fade_yourname.fla] 8. ZOOM IN ZOOM OUT [save as: zoom_yourname.fla] |
FLASH CS5.5 TUTORIALS
Create an example that shows you understand the technique and tools for #2-#9. Save all your work.
Save as QUCKTIME videos (FILE>EXPORT>MOVIE), don't submit ".fla" files.
- FLASH CONTROL PANEL
- THE FILL VS STROKE COLOR [save as: COLOR_yourname.fla]
- WORKING WITH LAYERS [save as: LAYERS_yourname.fla]
- CREATING FRAME BY FRAME ANIMATION [save as: FBF_yourname.fla]
- UNDERSTANDING FRAMES, KEYFRAMES, and BLANK KEYFRAMES [save as: FRAMES_yourname.fla]
- WHAT IS A SYMBOL? [save as: SYMBOL_yourname.fla]
- WORKING WITH CLASSIC TWEENS- 7 part series [save as: TWEENS_yourname.fla]
- ADDING A CLASSIC MOTION GUIDE [save as: MOTIONG_yourname.fla]
- CREATE A LAYER MASK [save as: LAYERMASK_yourname.fla]
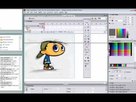
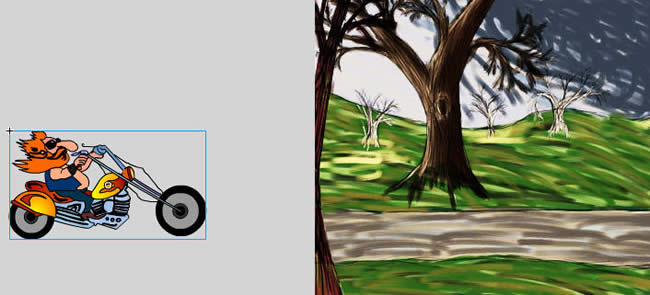
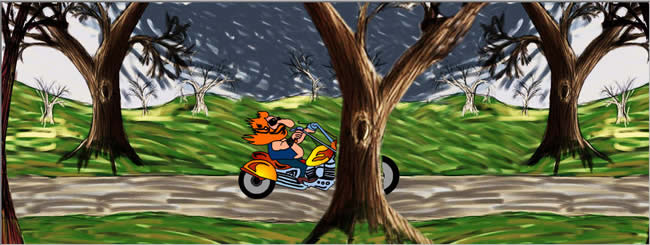
FLASH CS5.5: SIMPLE ANIMATION [Biker]
|
In this tutorial, you will learn how to create a simple biker animation in Flash CS5 with a snowfall effect in the background. This tutorial will teach how to create frames, keyframes, blank frames & motion tweens. You will also learn how to use the deco tool to create a simple snow fall effect. Download the tutorial files below.
|
| ||
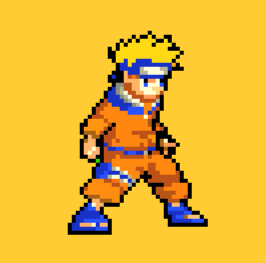
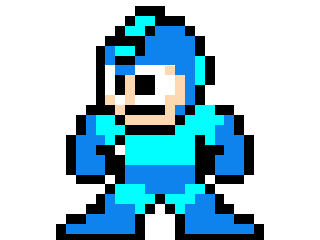
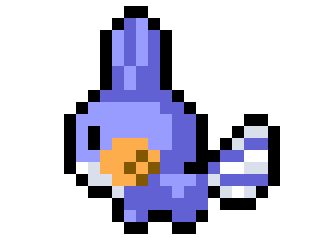
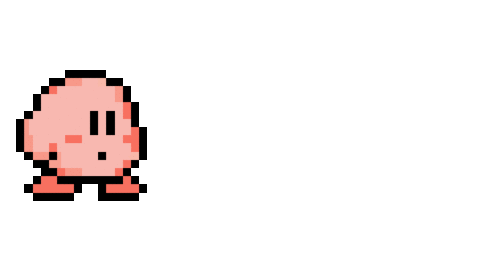
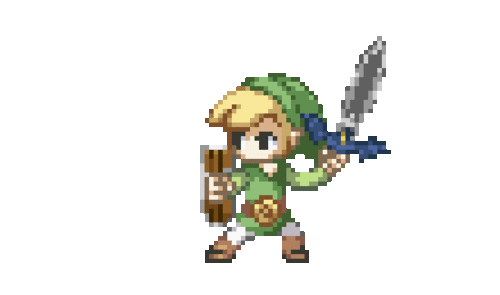
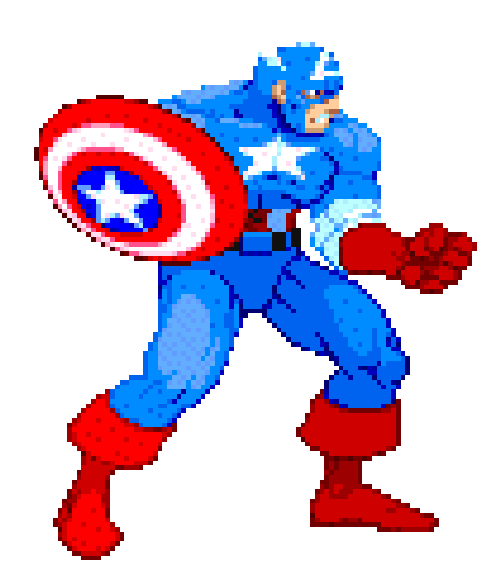
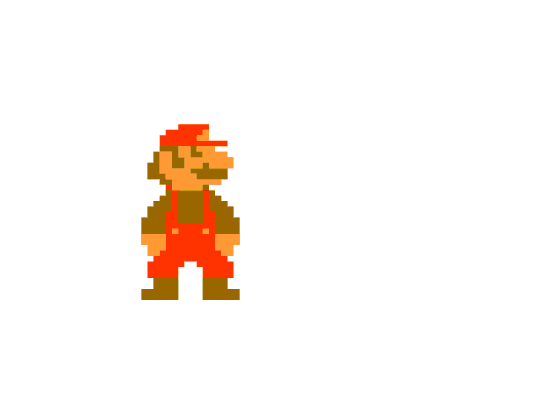
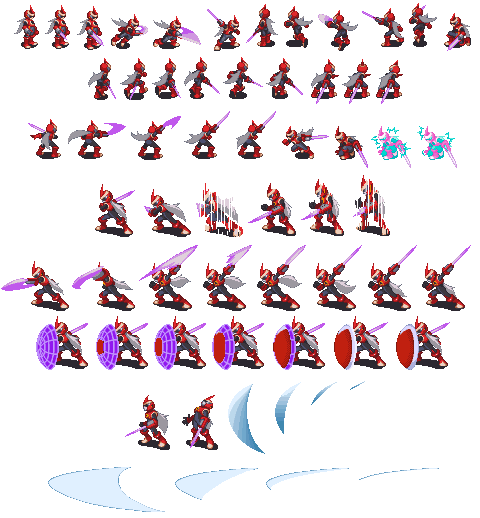
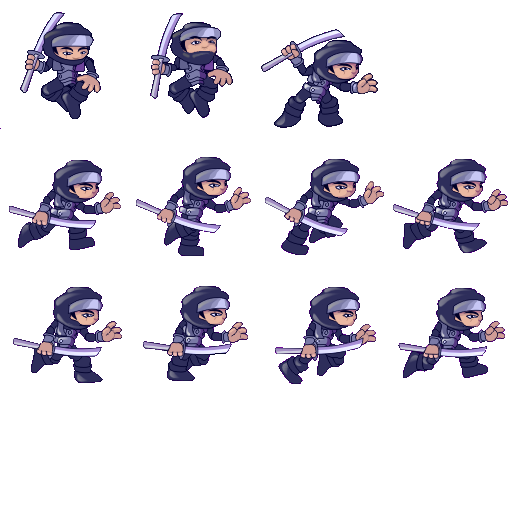
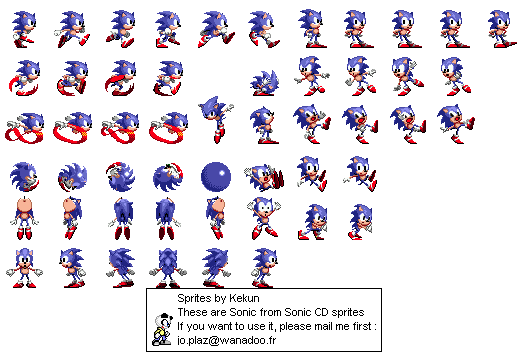
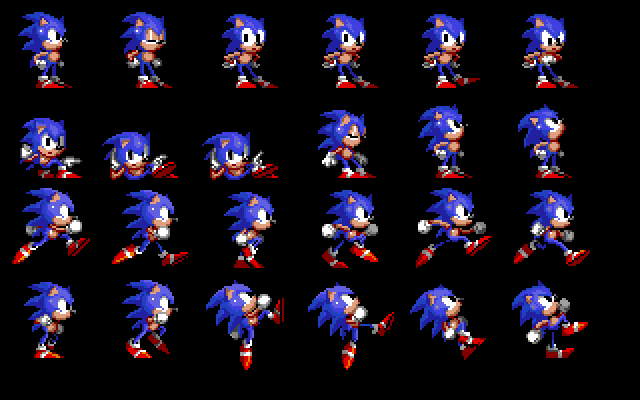
SPRITES + GAME ANIMATION
|
|
WHAT ARE SPRITES IN ANIMATION?
In basic terms it is a graphic used to depict a character or feature in a 2D game. These are computer graphics that may be moved on-screen and otherwise manipulated as a single entity. They are several 2D graphics images of one object or character for each of it's possible positions and states. The game engine displays the correct image based on the object's or character s position. PROJECT OBJECTIVES: Create a short >30 second animation using sprites. Your animation clip must have a background, and character interactions. You will use the 8 Flash techniques you completed in your previous tutorials. The Sprite animation will be evaluated on the usage of the Flash techniques, story creativity, fluid character movements, and animation continuity. |


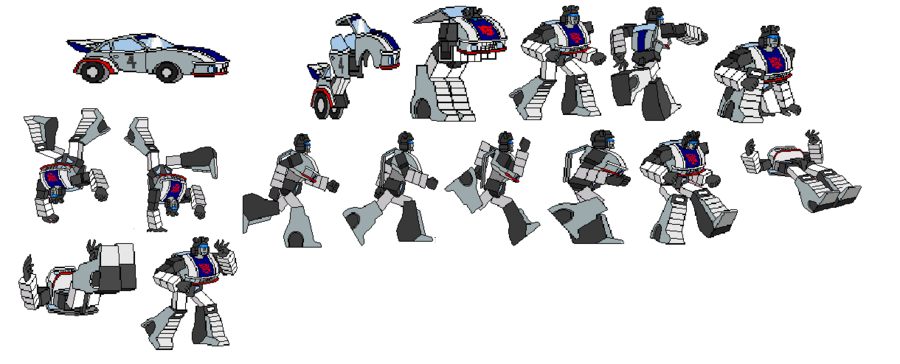
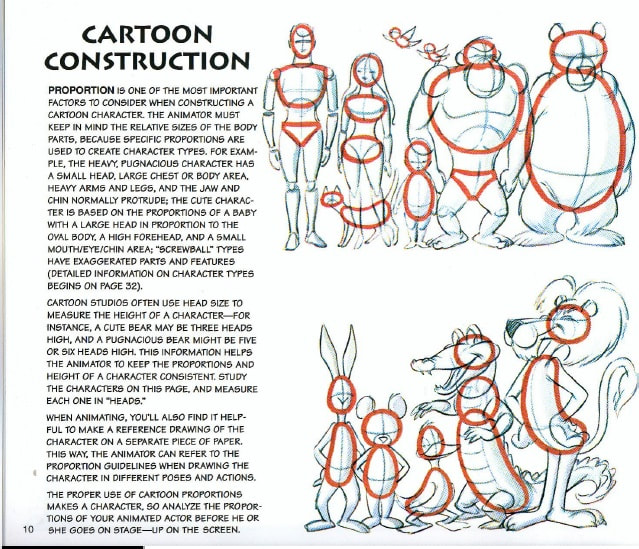
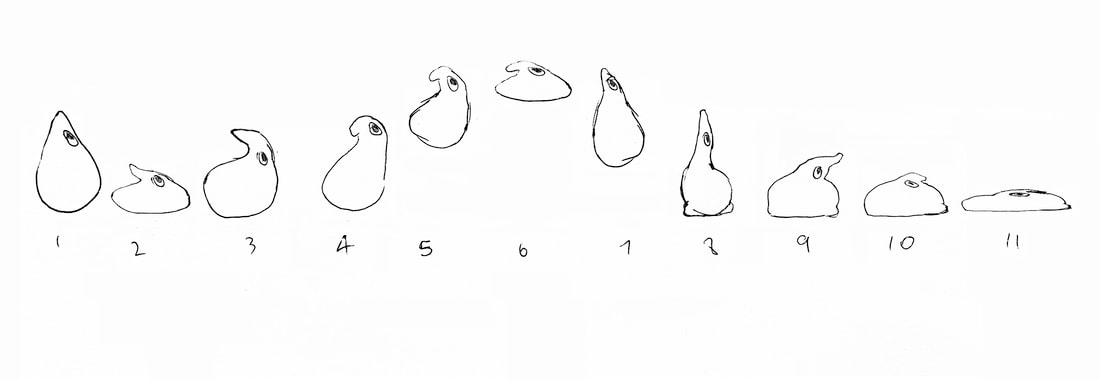
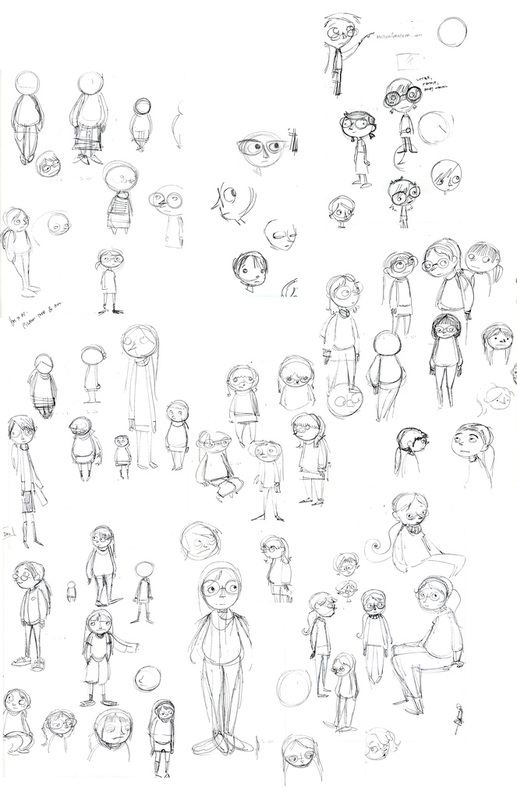
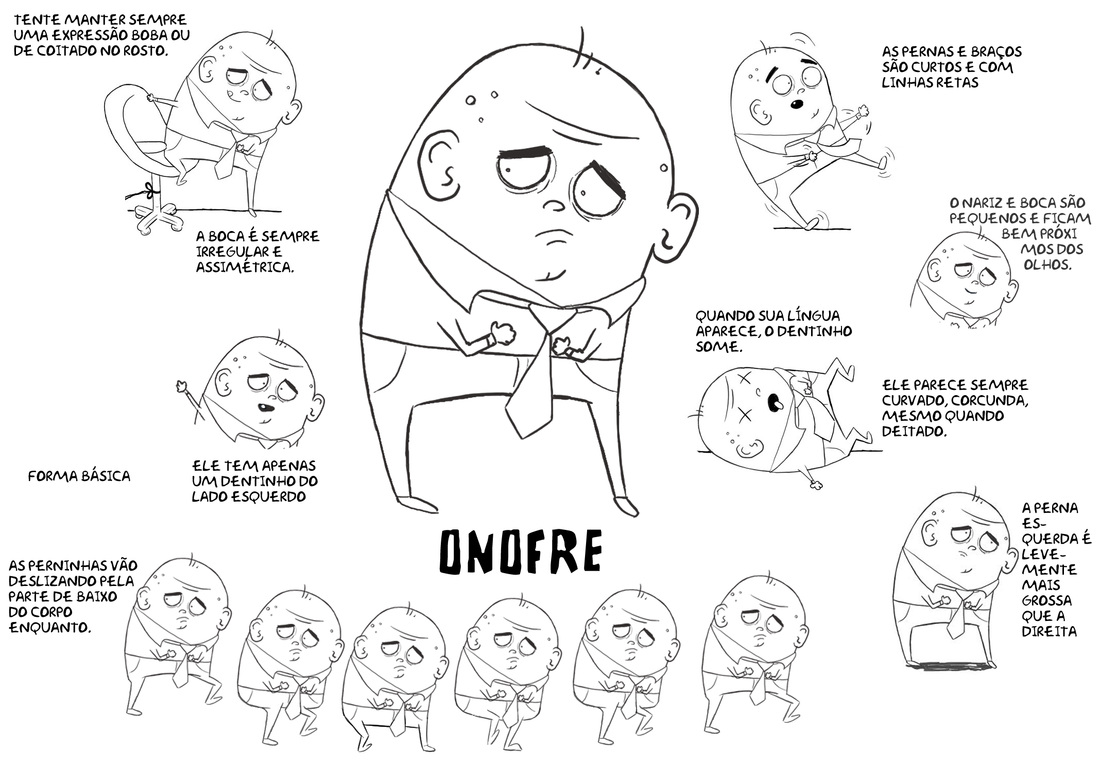
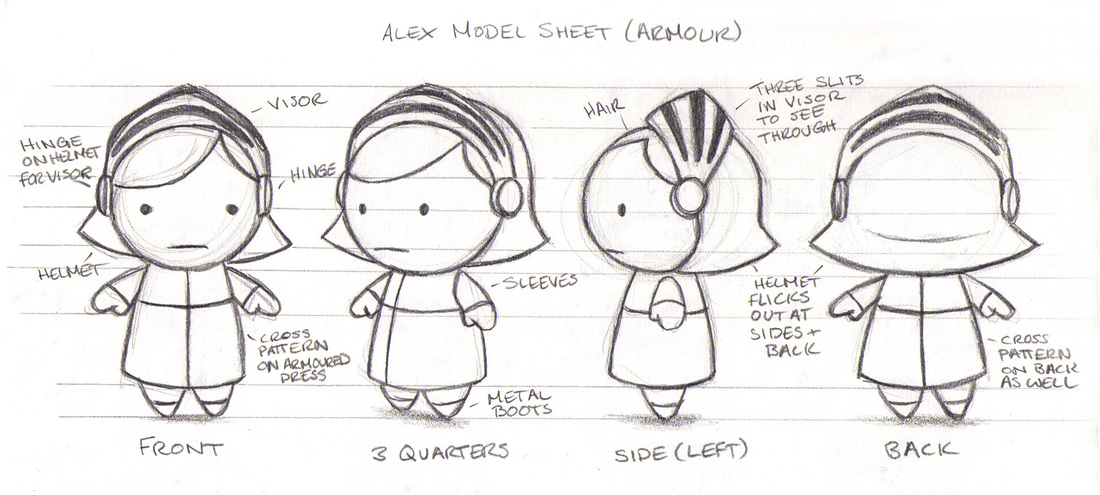
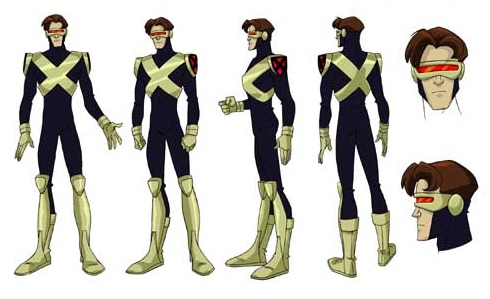
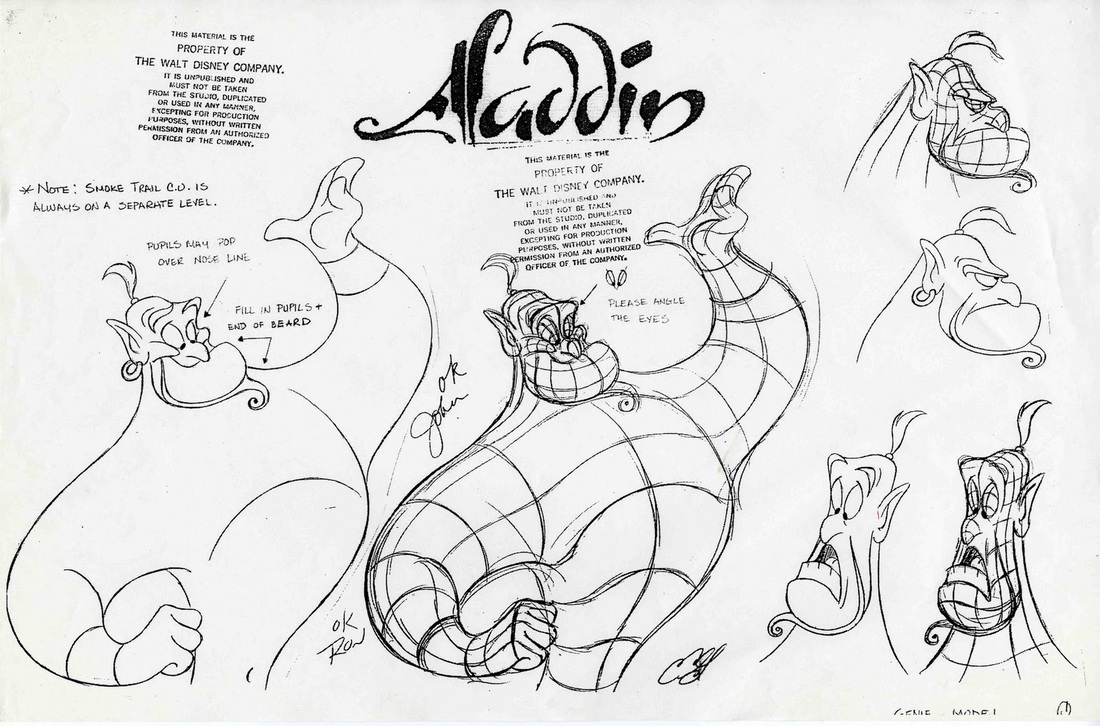
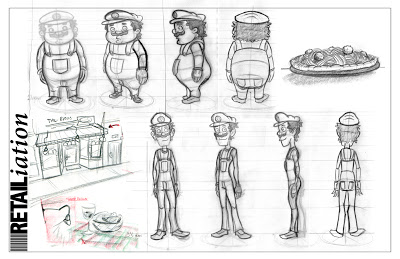
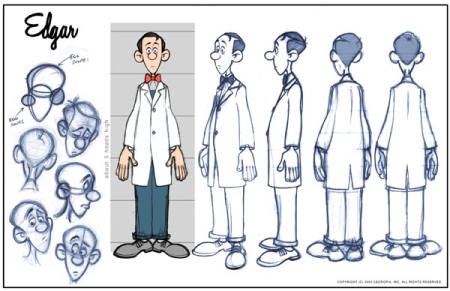
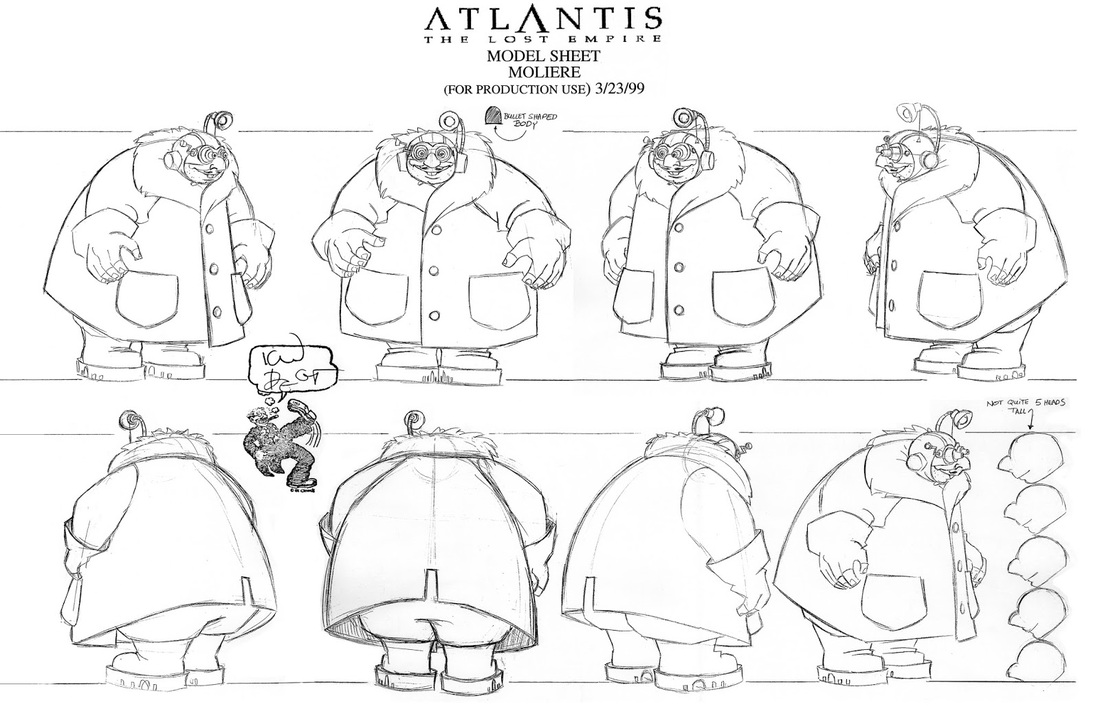
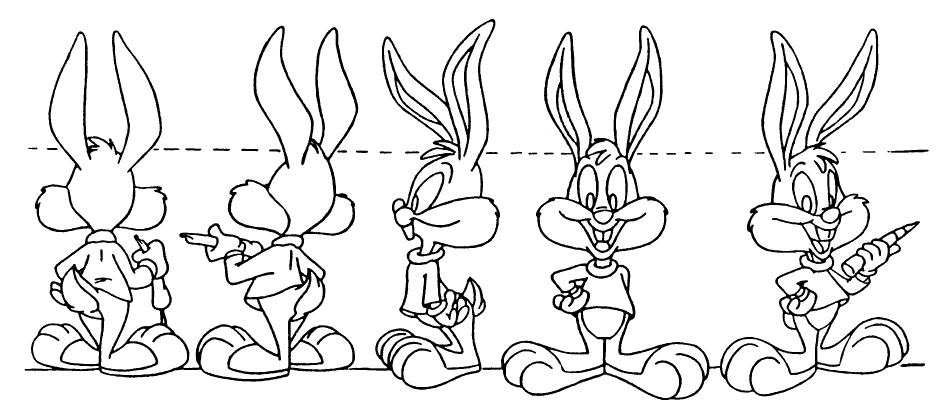
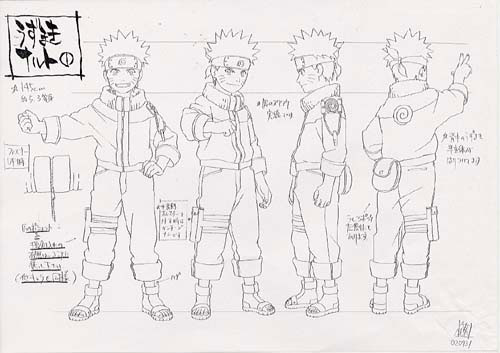
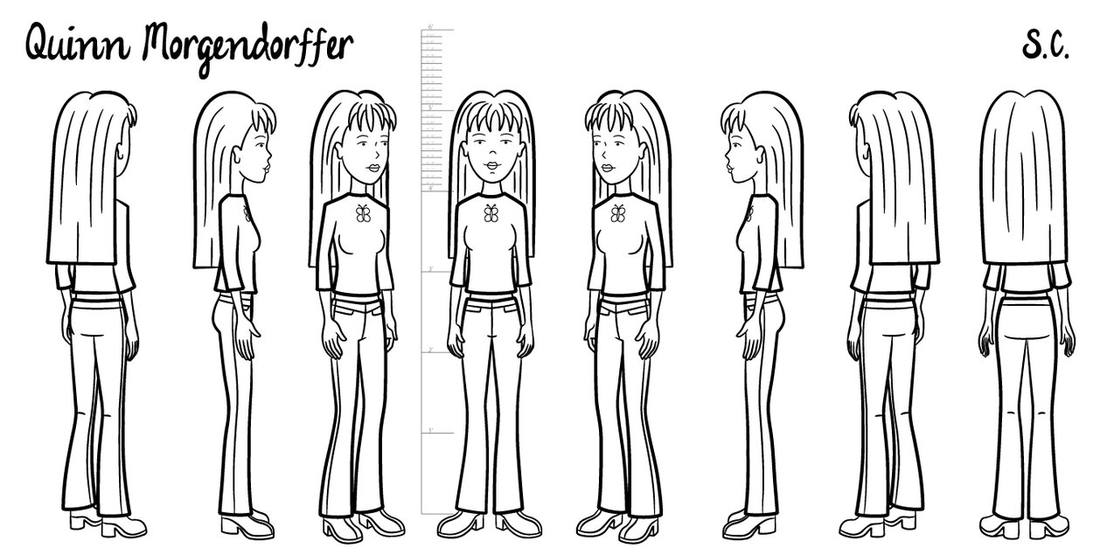
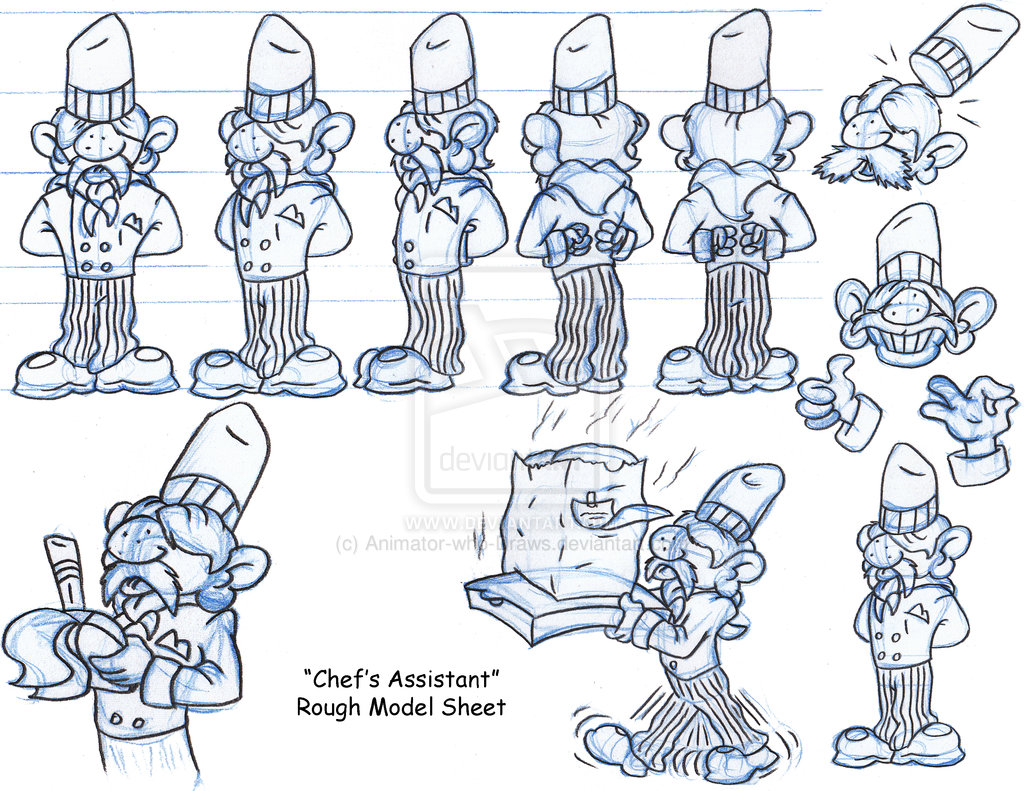
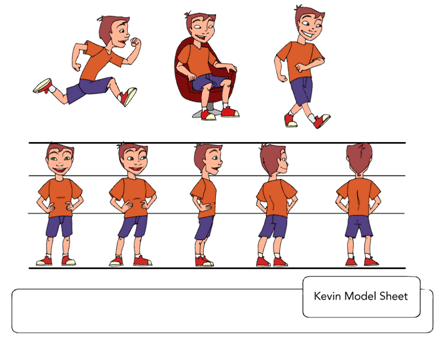
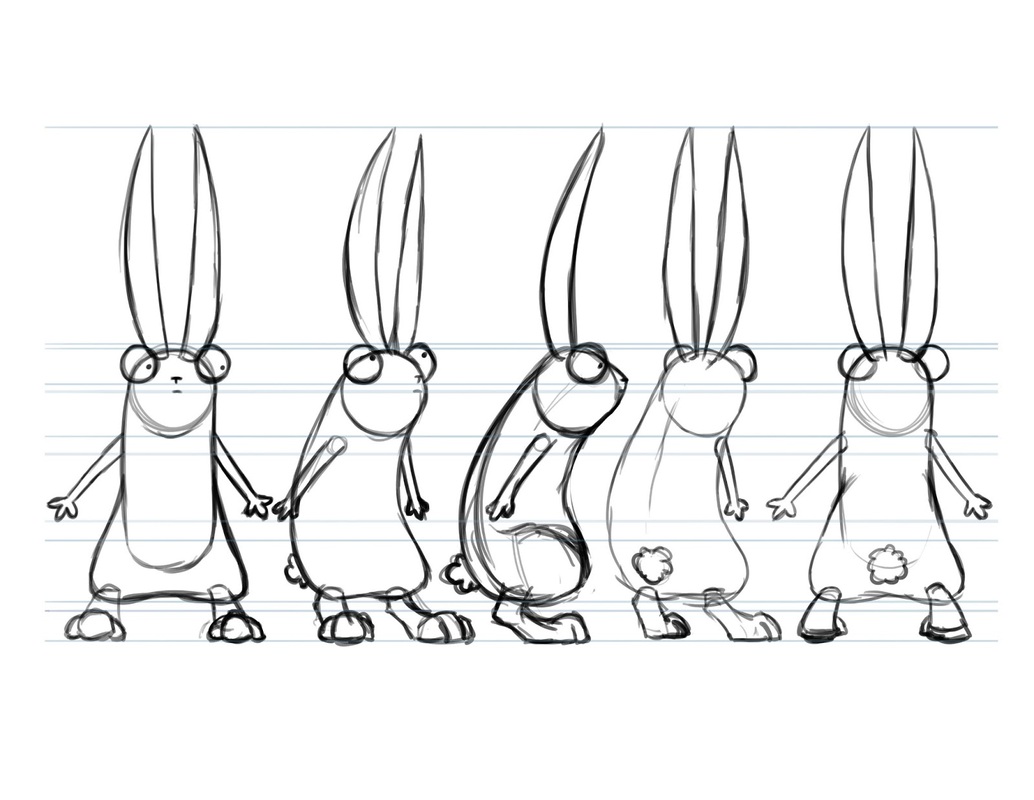
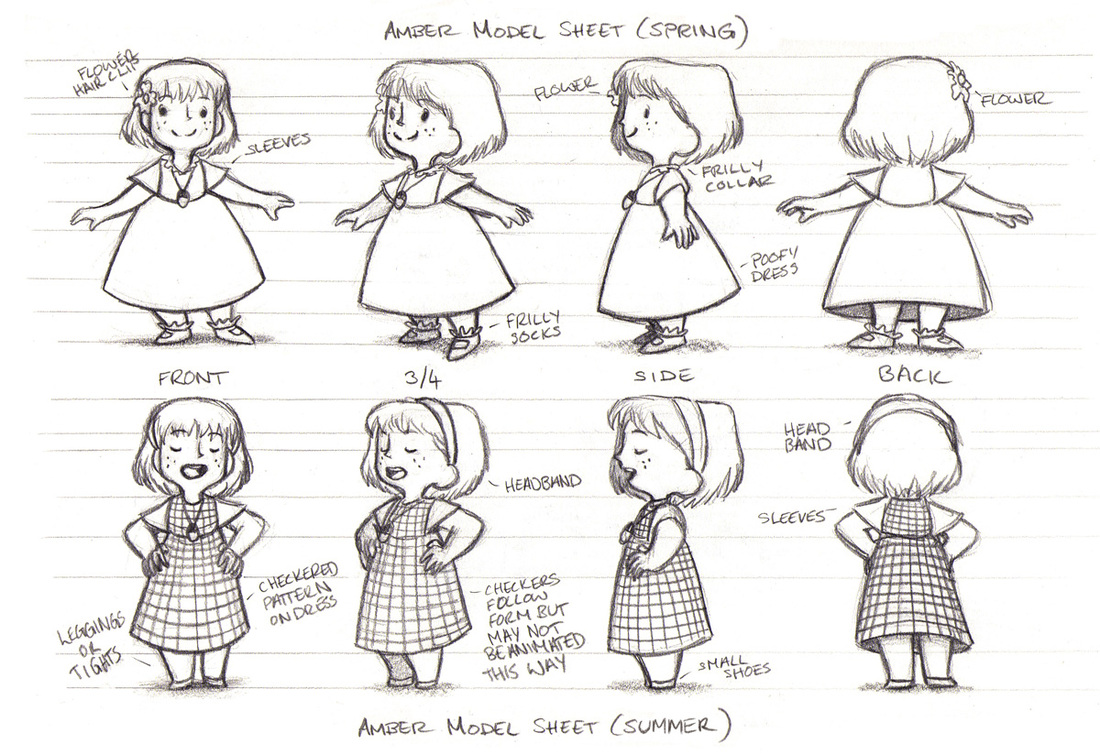
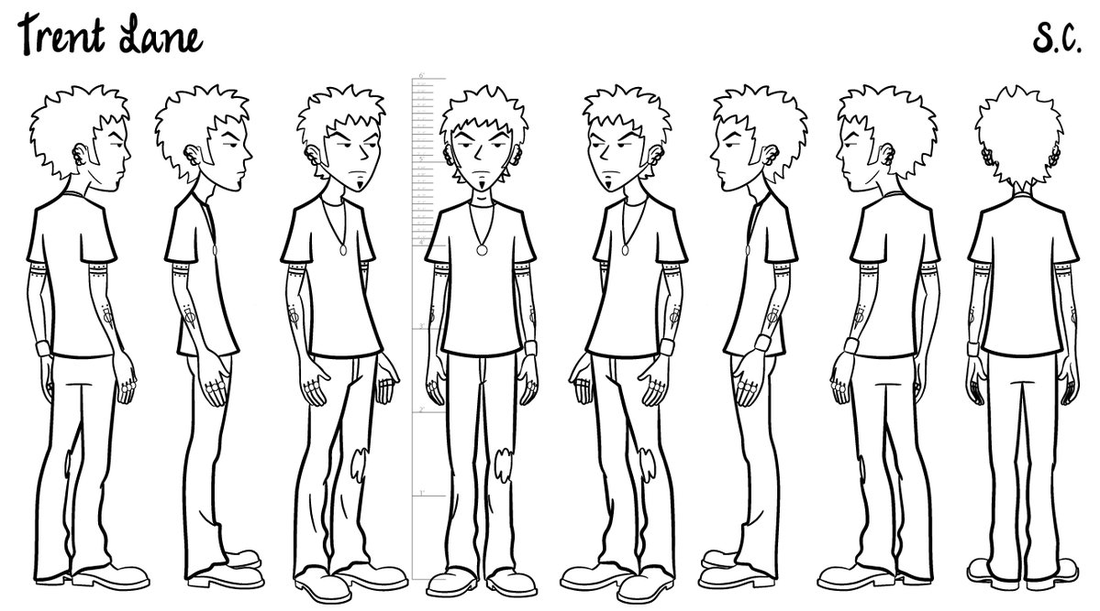
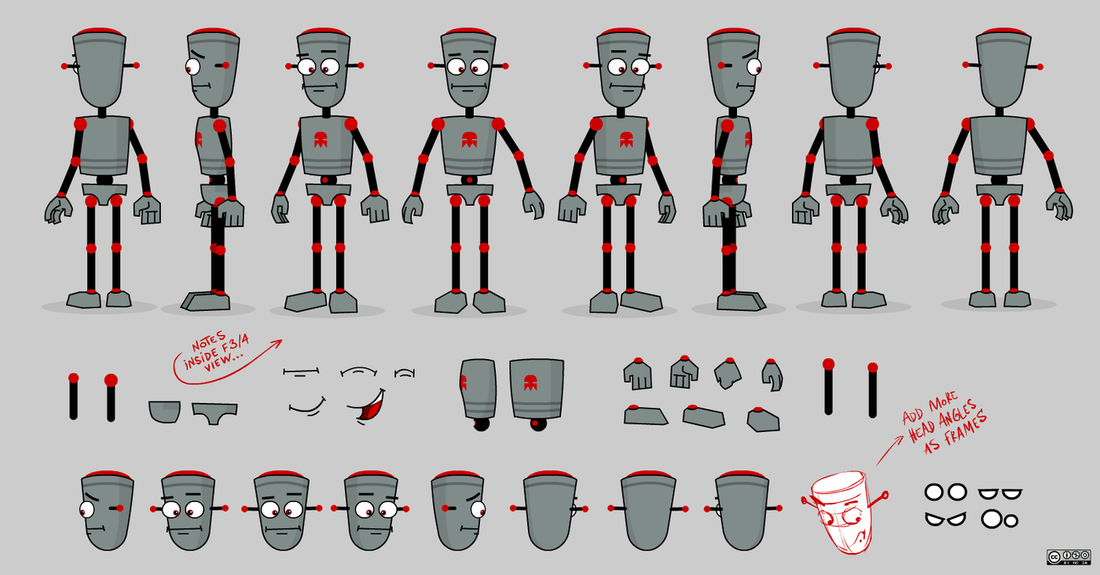
CHARACTER DESIGN + PRODUCTION MODEL SHEET
|
|
Character design involves developing the appearance and features of characters in an animation. Often an actual model (often referred to as a maquette) will be produced using modelling clay in order to get a better idea of the appearance of the character. Character Model Sheets and Expression Sheets are produced to help animators be consistent with the appearance of characters. Character Line-up Sheets are also produced to compare the scale of the characters against one another.
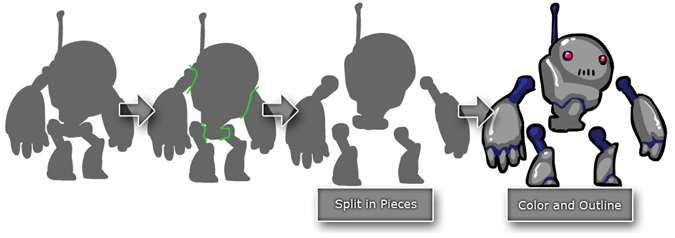
They provide the construction, structure, proportion, design, etc. for each character. Usually, several models sheets are needed for each character to show the physical and design nuances. Each animator, artist has their own style of drawing. The model sheet guides the 300 or so artists working on the production toward making all the characters look “ON MODEL”. “ON MODEL” means the model sheets have been followed to perfection as if one artist (instead of over 300 ) has drawn the character. PROJECT OBJECTIVE: is to create your own ORIGINAL character design (no tracing or copying). Sketch out possible designs for your character (minimum of 8 variations) in your sketch book. When you have finalized your character, create a CHARACTER MODEL SHEET with the 8 poses for it. A CHARACTER ROTATION should include a front view, back view, 3/4 front (left & right), 3/4 back (left & right), and profile view (side) of the character. These views help the animator (s) understand the character's construction and proportion. The ability to turn a character is an element of animation which increases the character's believability. The easiest and best way to draw out a rotation is to break down the character into its simplest forms. .. then you just rotate the forms. Here's a design tip - make the ball of the head and the body different sizes (big head with small body or small head with a big body). Hand in your drawings. Hand in a Quicktime video of your character rotating (created in FLASH). |


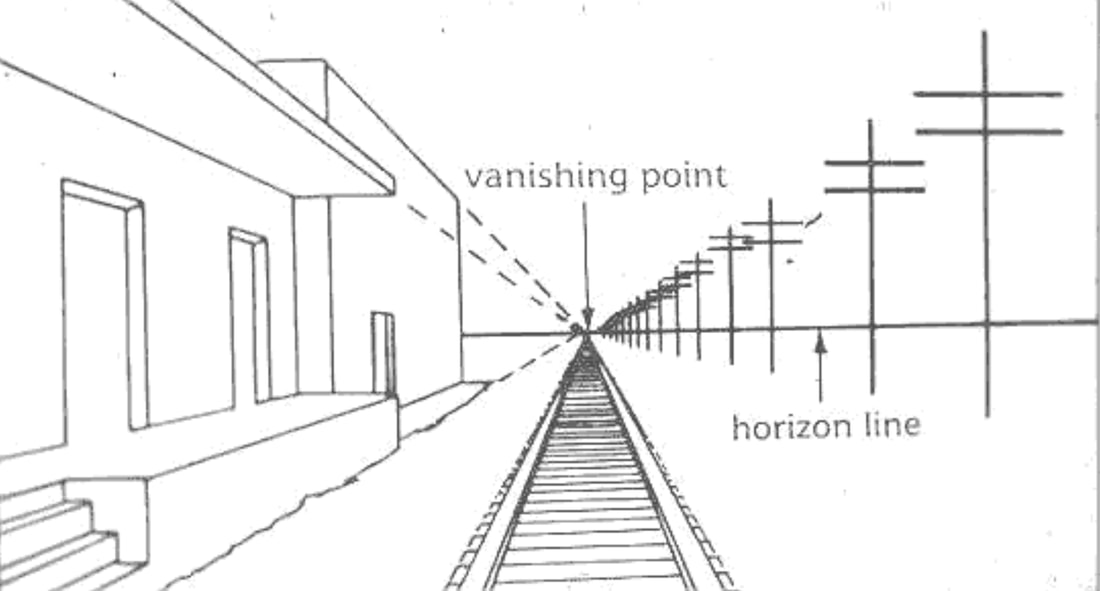
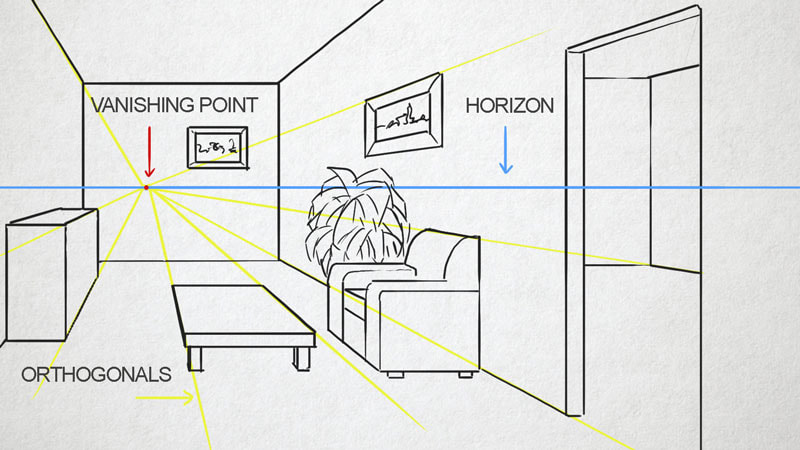
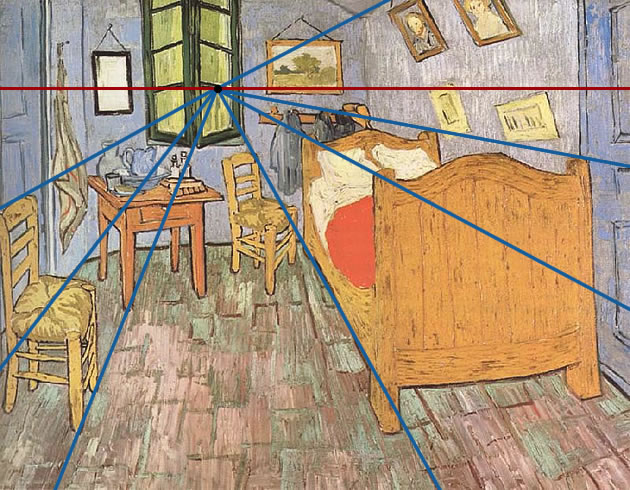
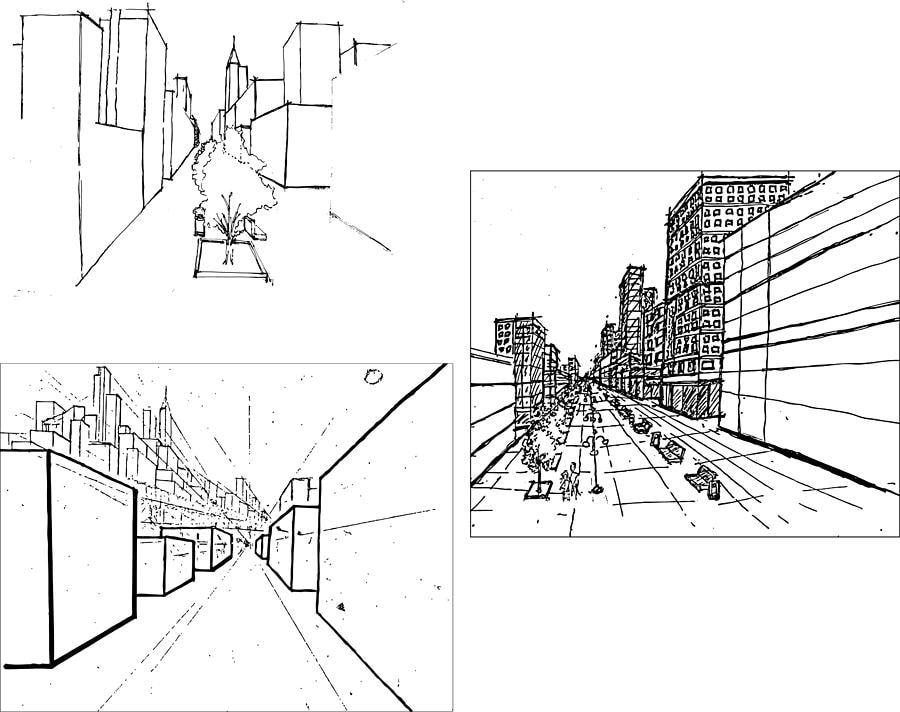
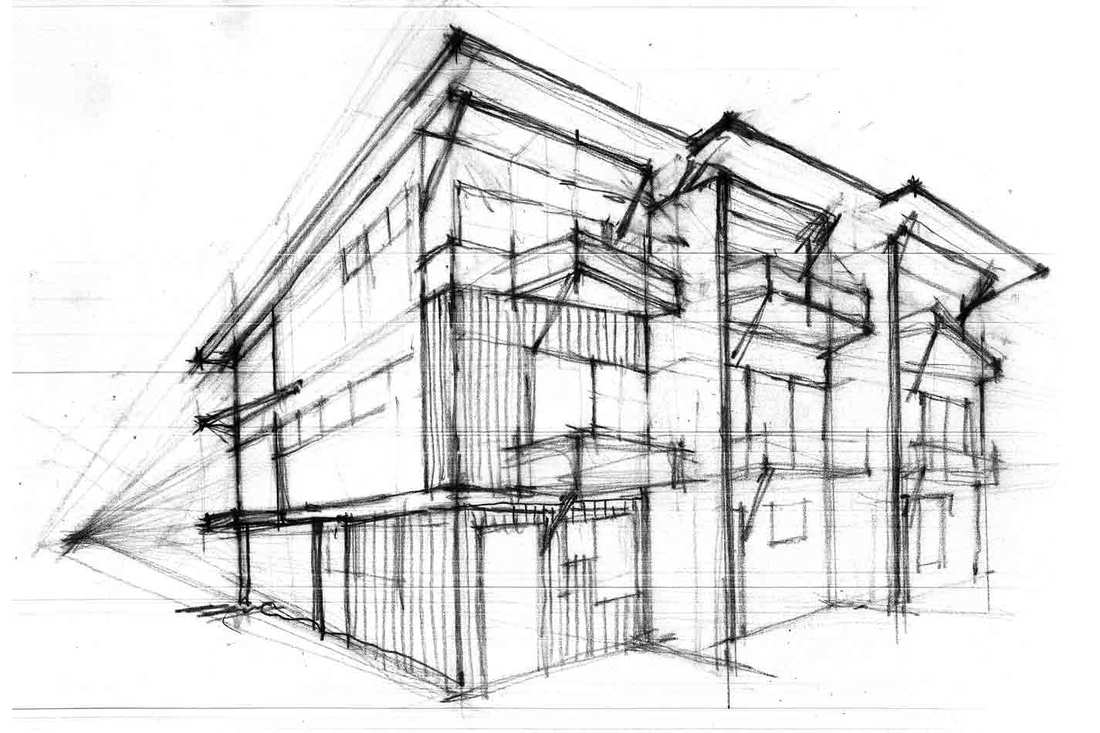
1 & 2 POINT PERSPECTIVE DRAWINGS
…a mathematical system for representing three-dimensional objects and space on a two-dimensional surface by means of intersecting lines that are drawn vertically and horizontally and that radiate from one point on a horizon line… |
Key Points:
Although this definition sounds complicated, the concept is relatively simple. One point perspective is a drawing method that shows how things appear to get smaller as they get further away, converging towards a single ‘vanishing point’ on the horizon line. It is a way of drawing objects upon a flat piece of paper (or other drawing surface) so that they look three-dimensional and realistic. Drawing in one point perspective is usually appropriate when the subject is viewed ‘front-on’ (such as when looking directly at the face of a cube or the wall of building) or when looking directly down something long, like a road or railway track. It is popular drawing method with architects and illustrators, especially when drawing room interiors. To understand more about the history of perspective in art, please read our accompanying Guide to Linear Perspective (coming soon). Note: If you need to draw something that is not facing you directly, but rather has a corner nearest to you, two point perspective is likely to be more appropriate. Surfaces that travel away from the viewer, on the other hand, converge towards a single ‘vanishing point‘. This is a point that is located directly in front of the viewer’s eyes, on a ‘horizon line’ (also known as an ‘eye level line’). |

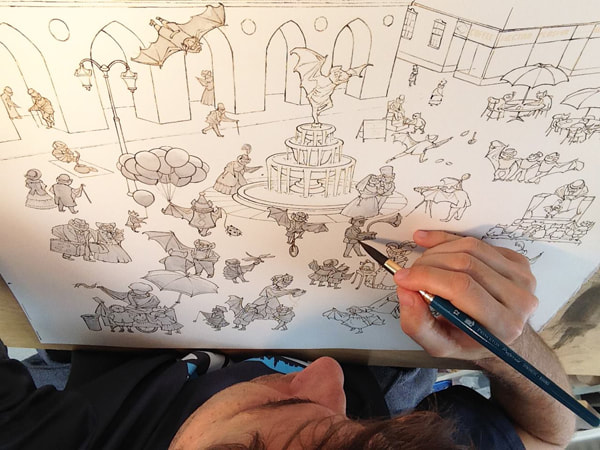
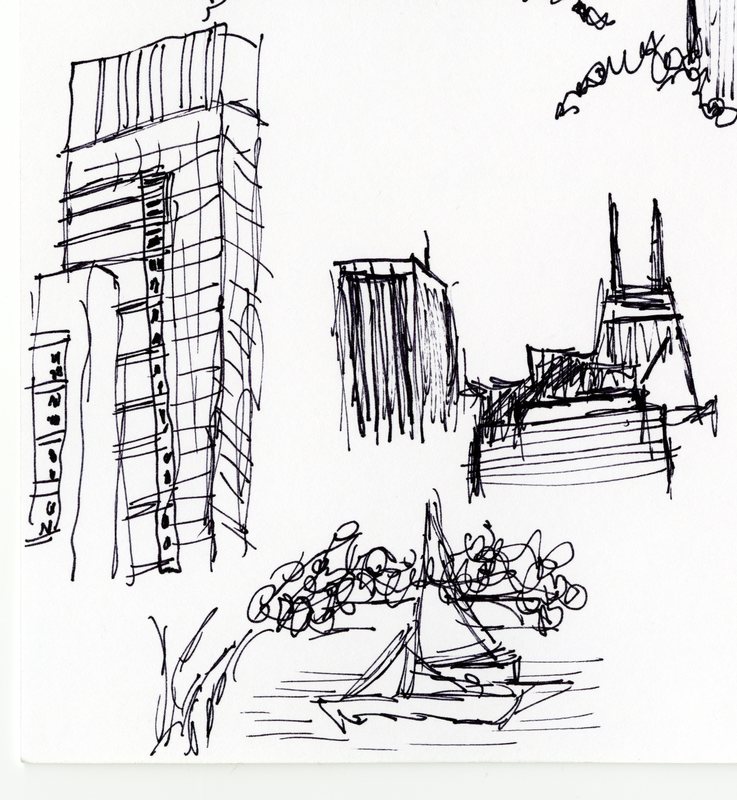
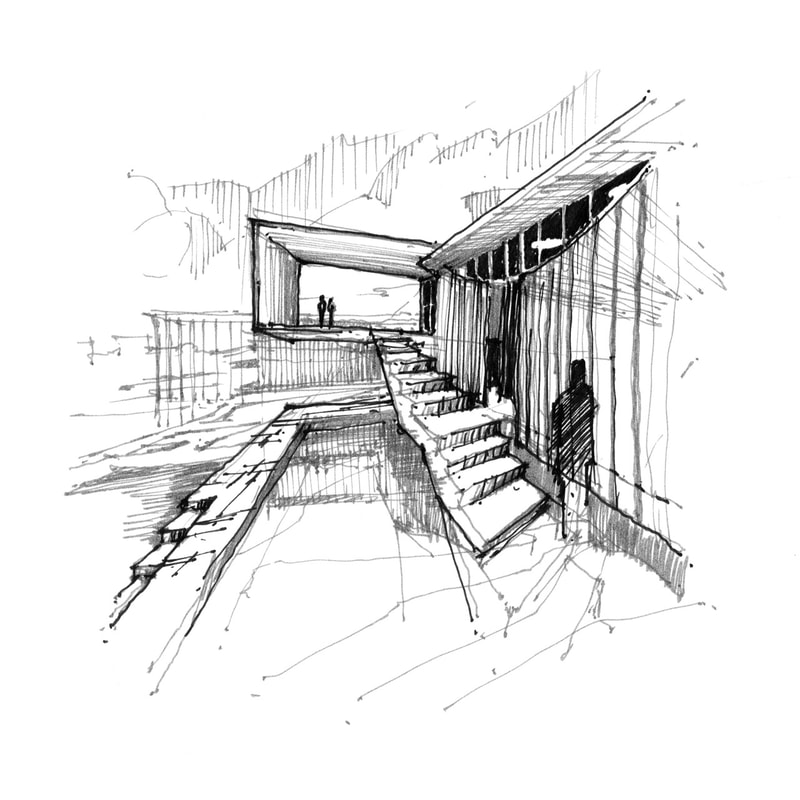
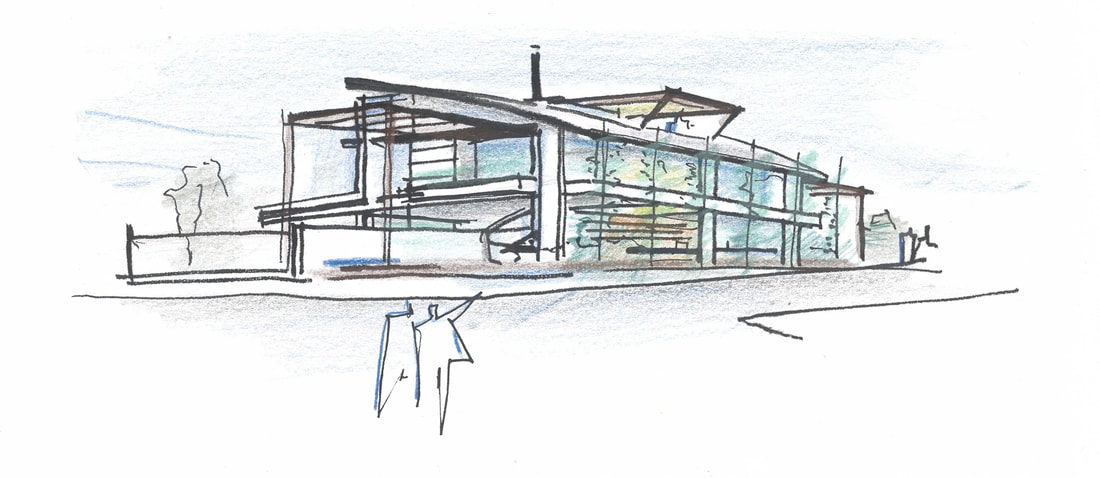
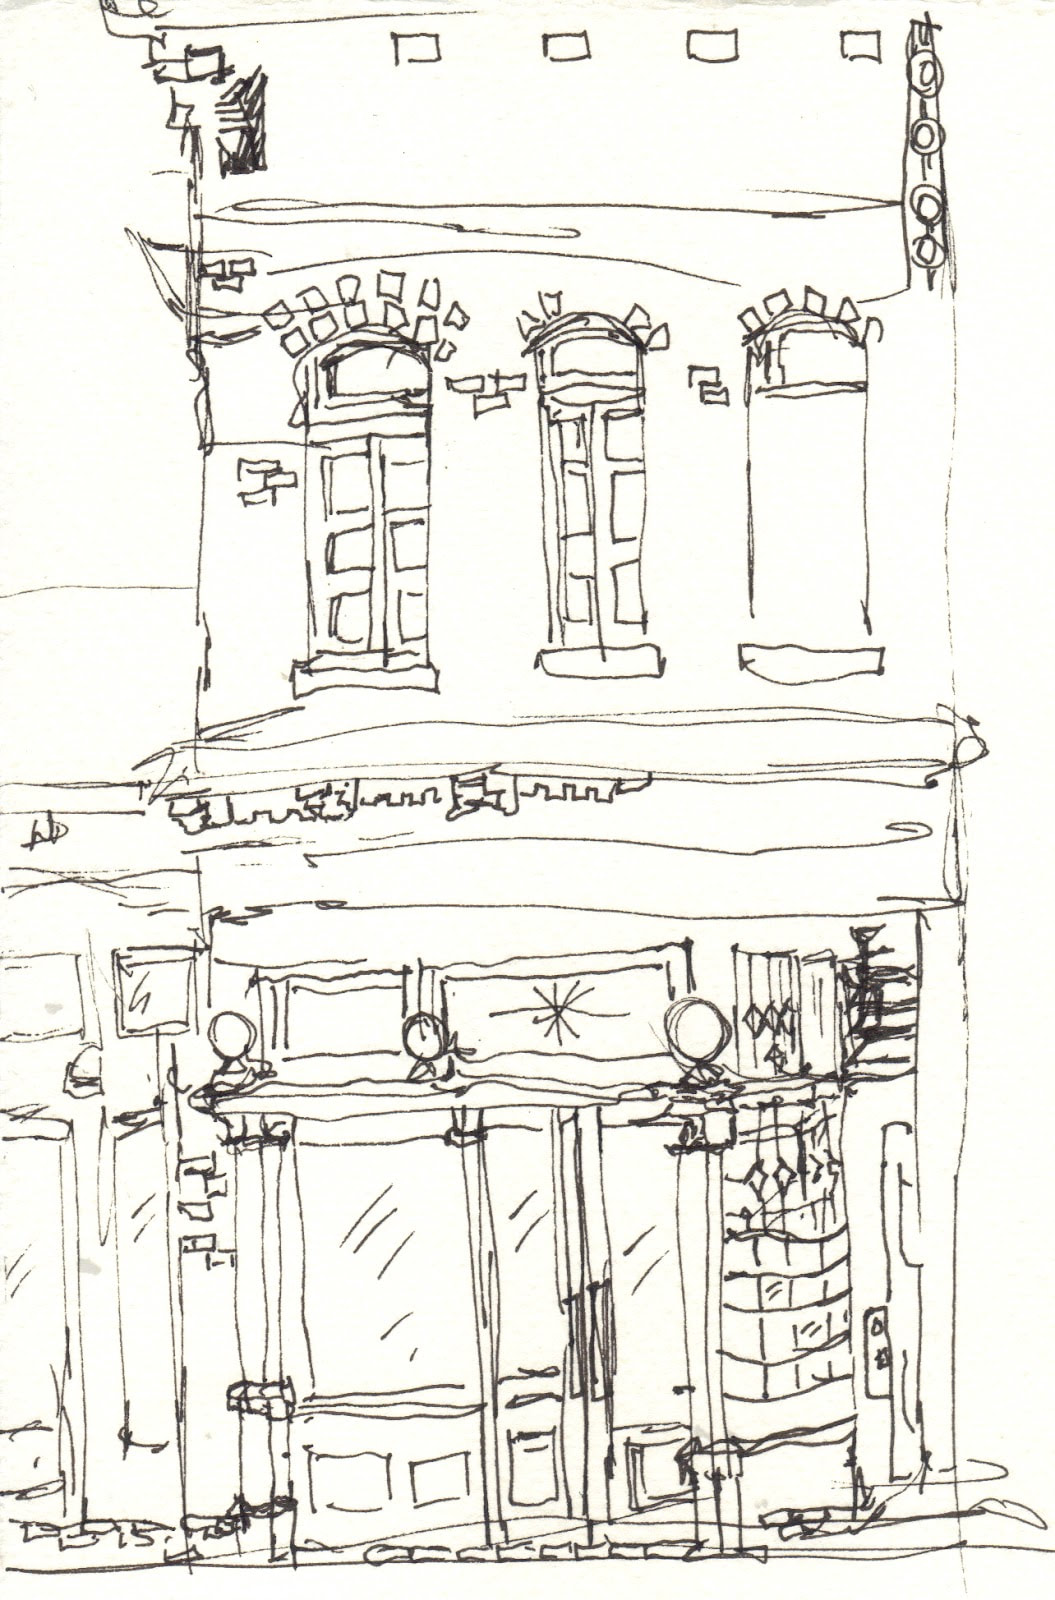
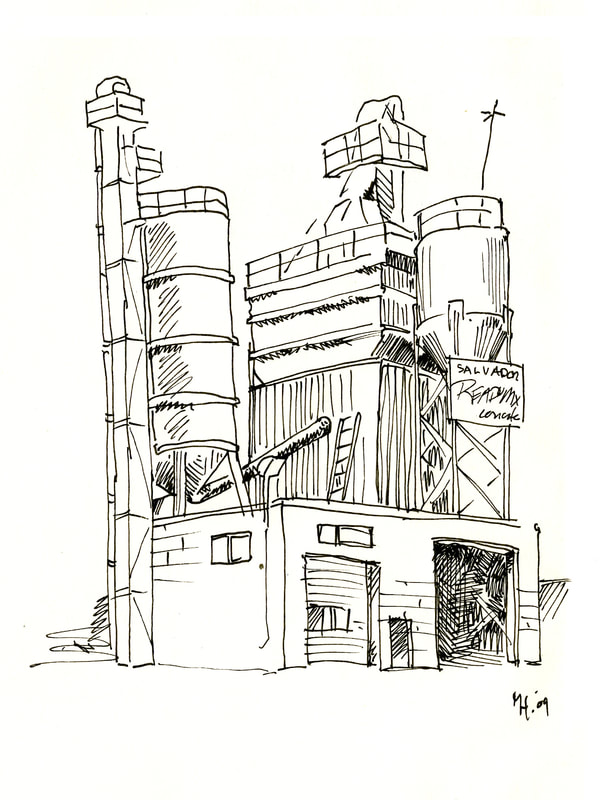
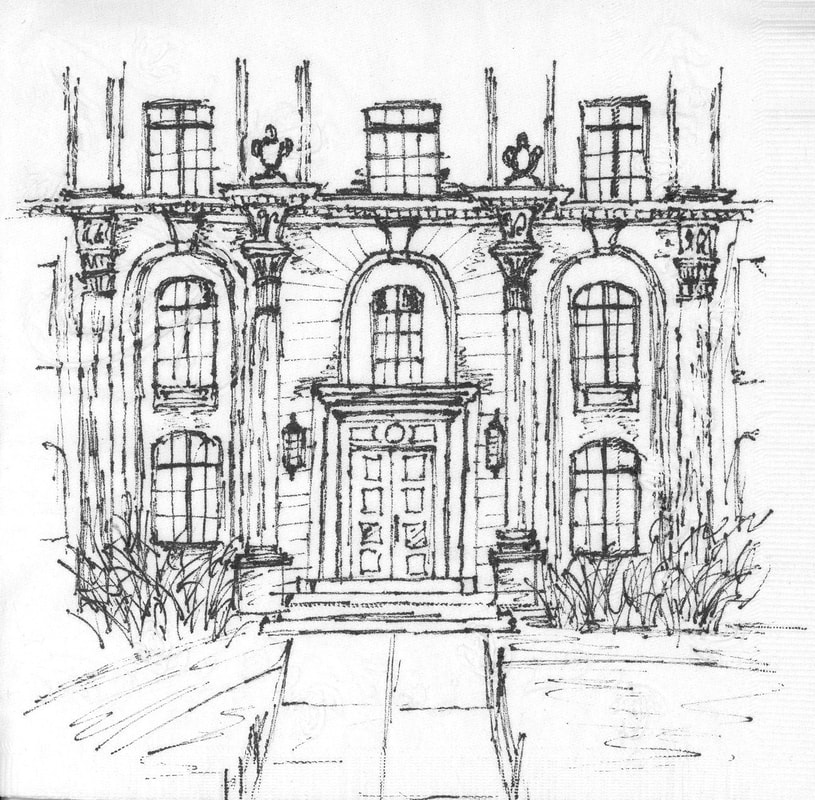
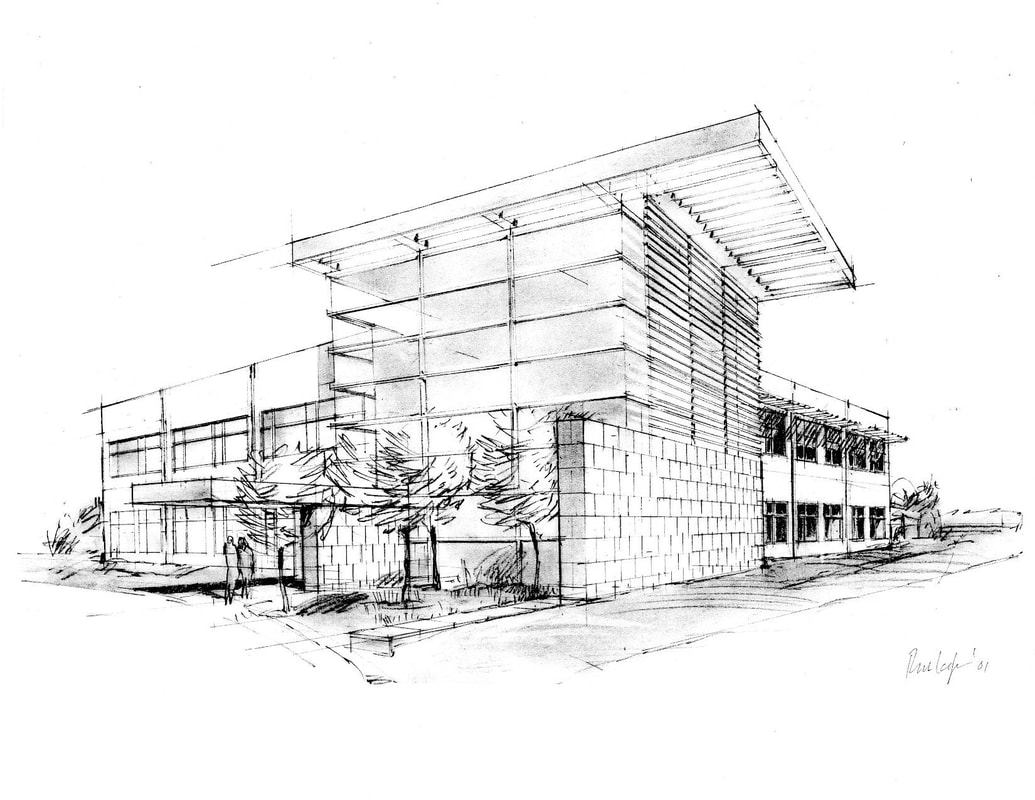
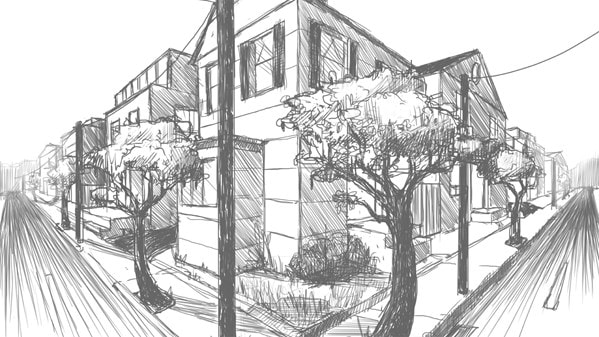
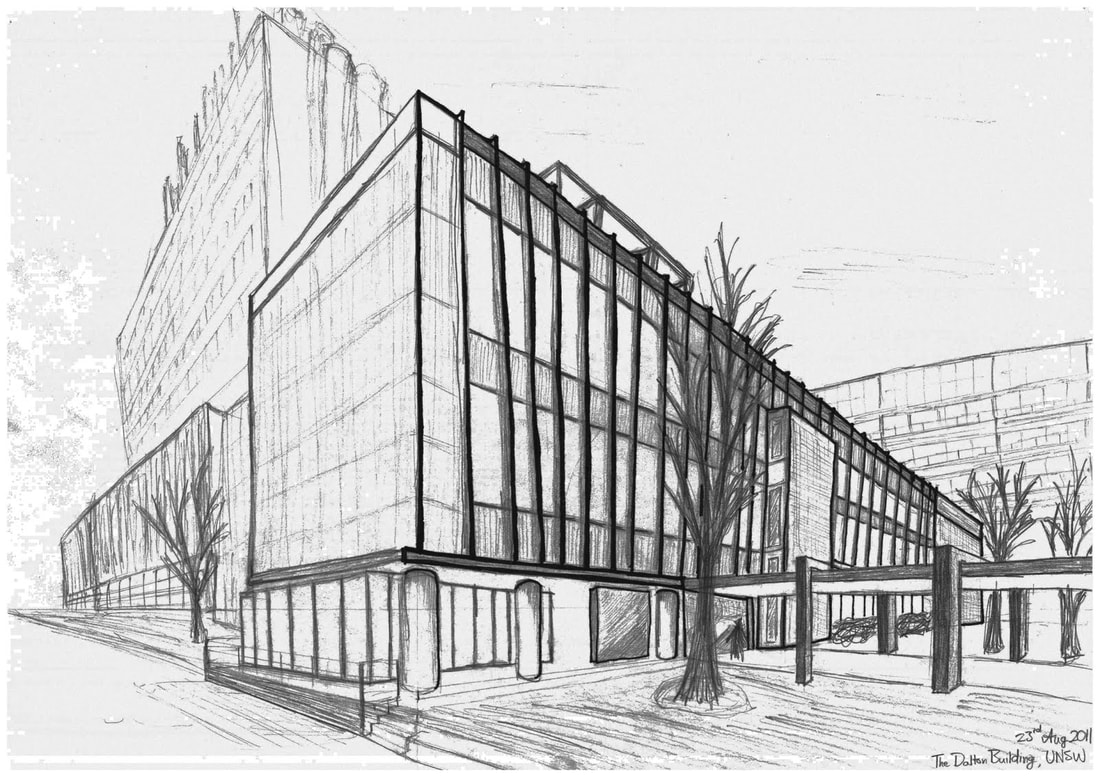
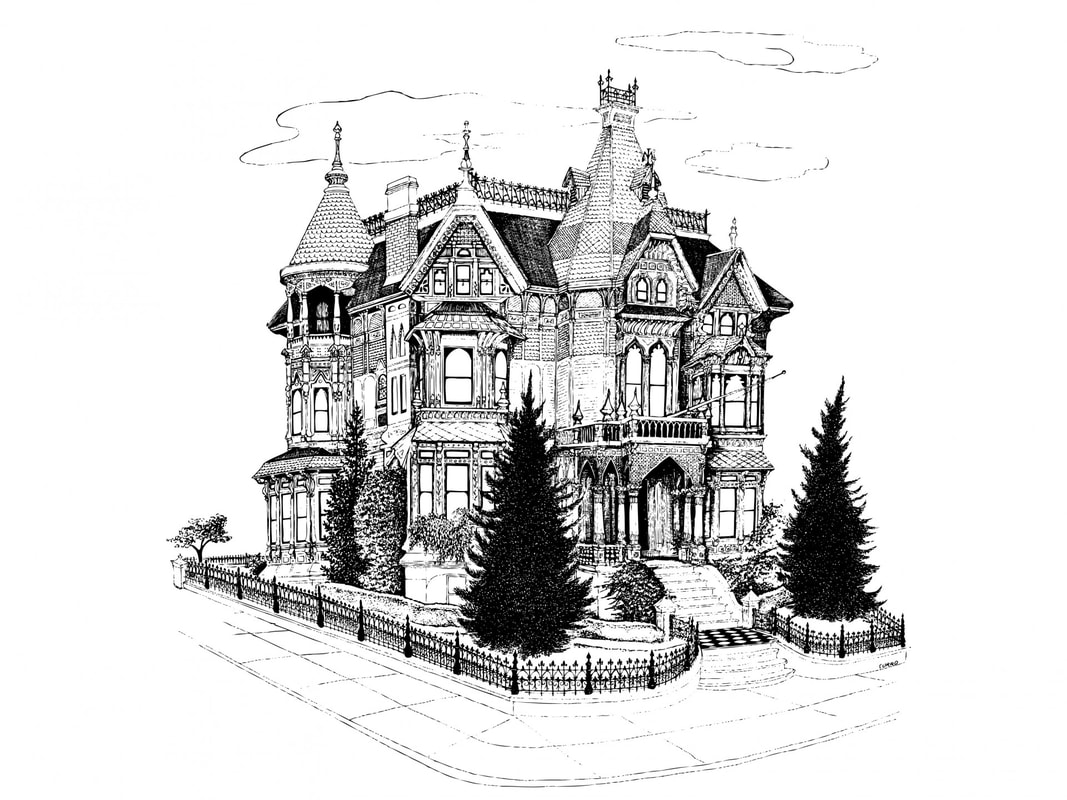
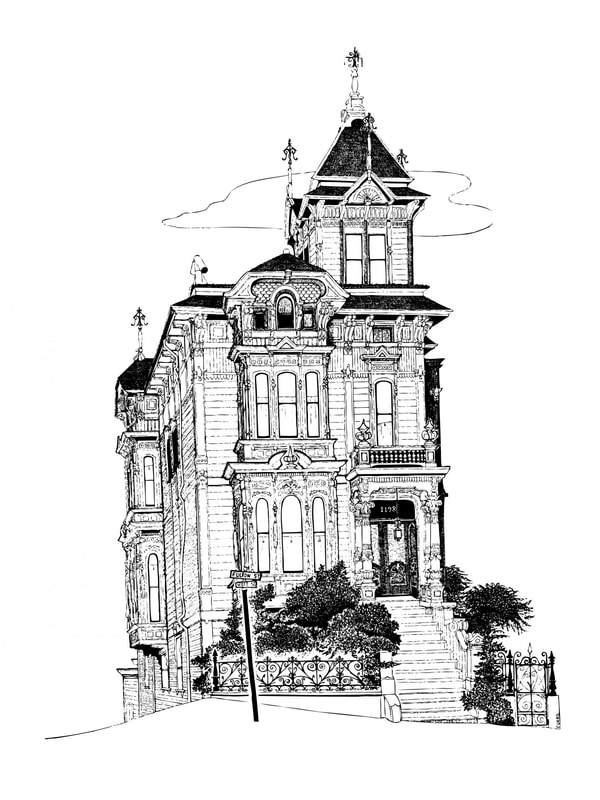
ANIMATION CHALLENGE 5: ARCHITECTURE & BUILDINGS
|
|
Draw 5 interesting & unique buildings
|

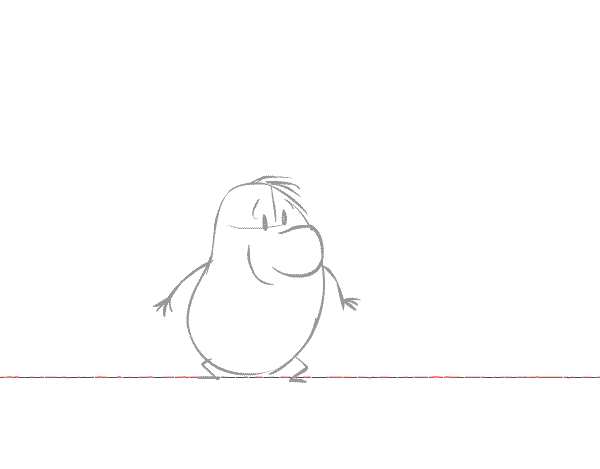
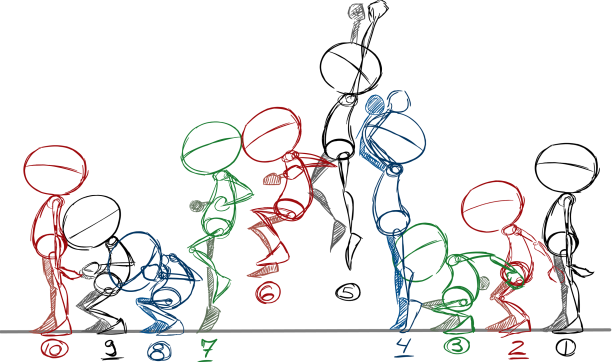
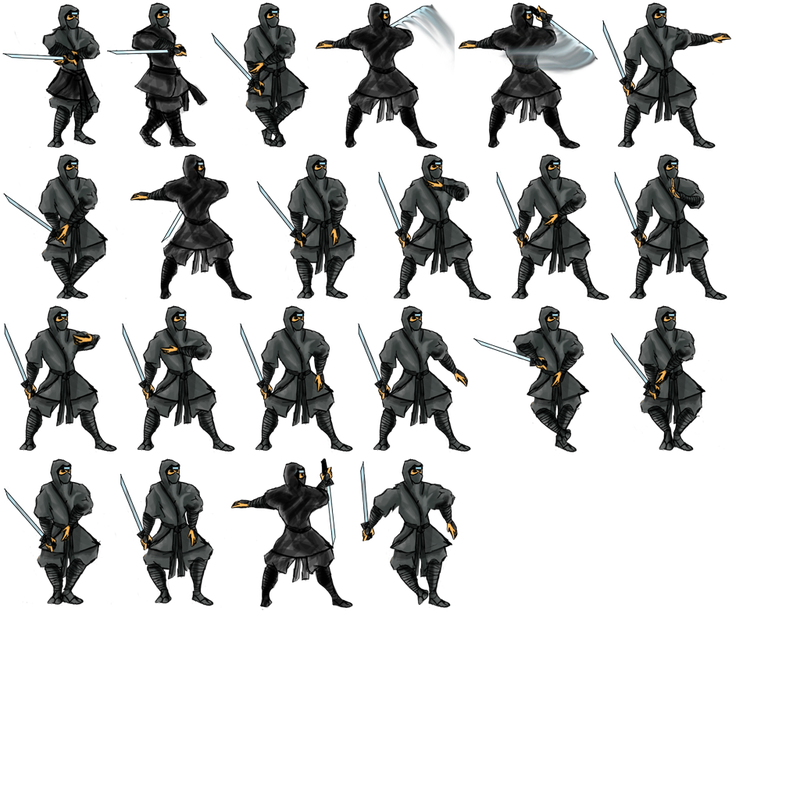
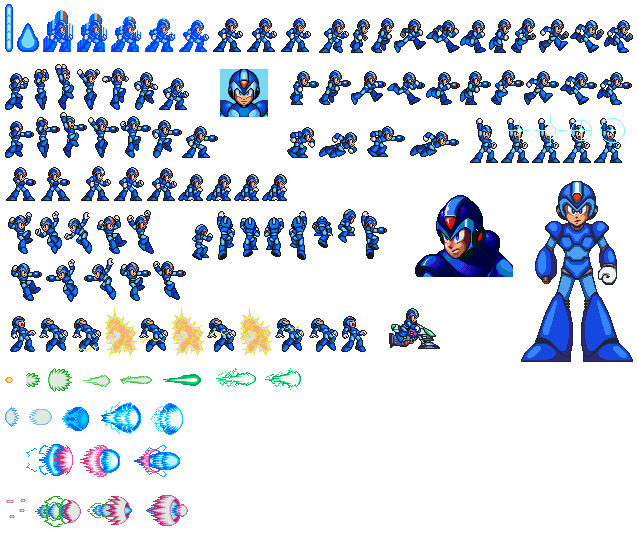
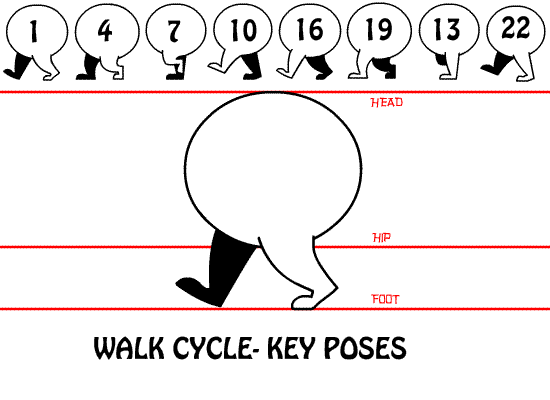
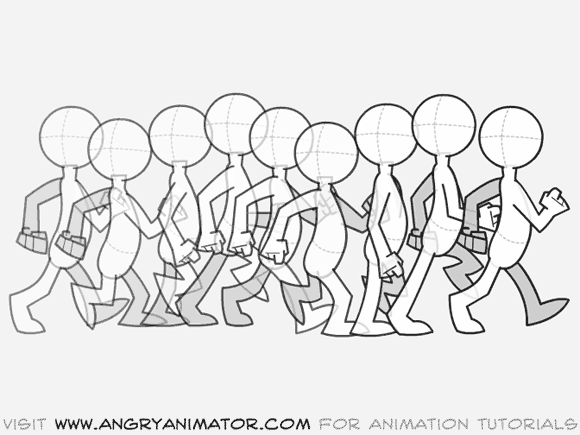
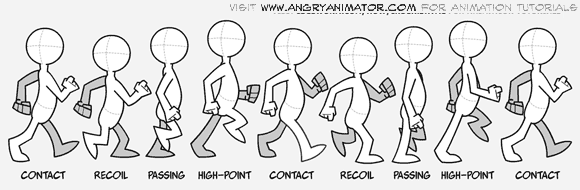
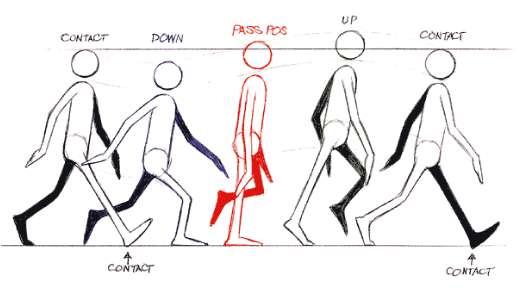
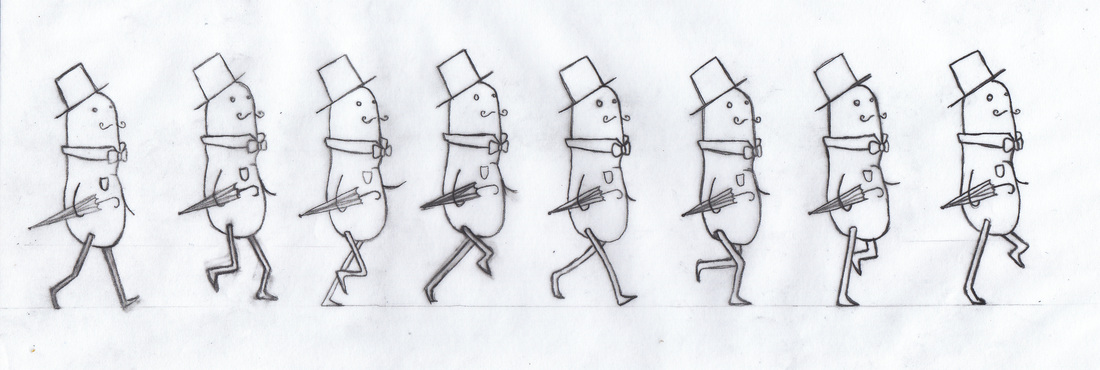
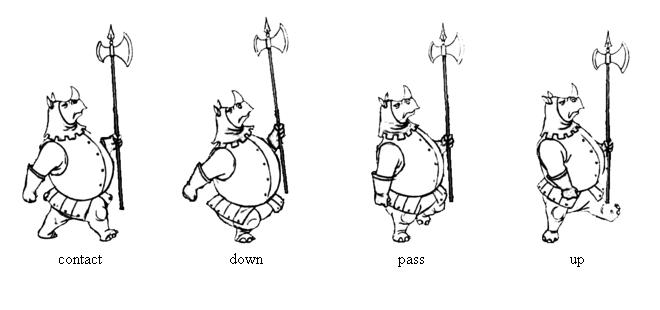
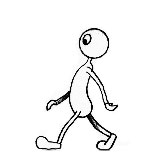
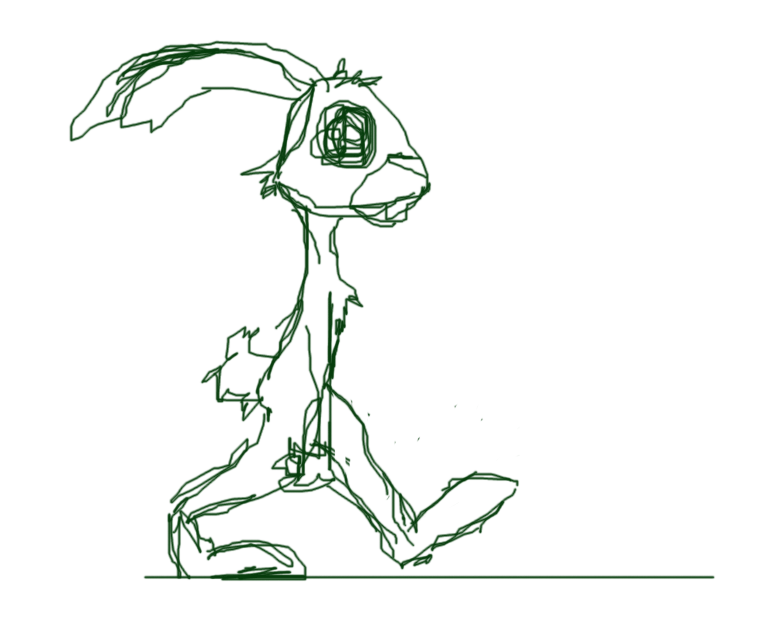
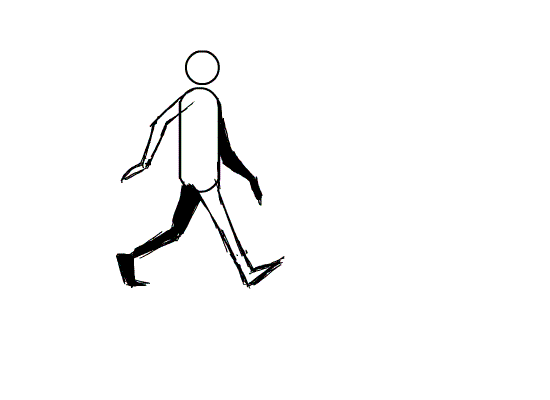
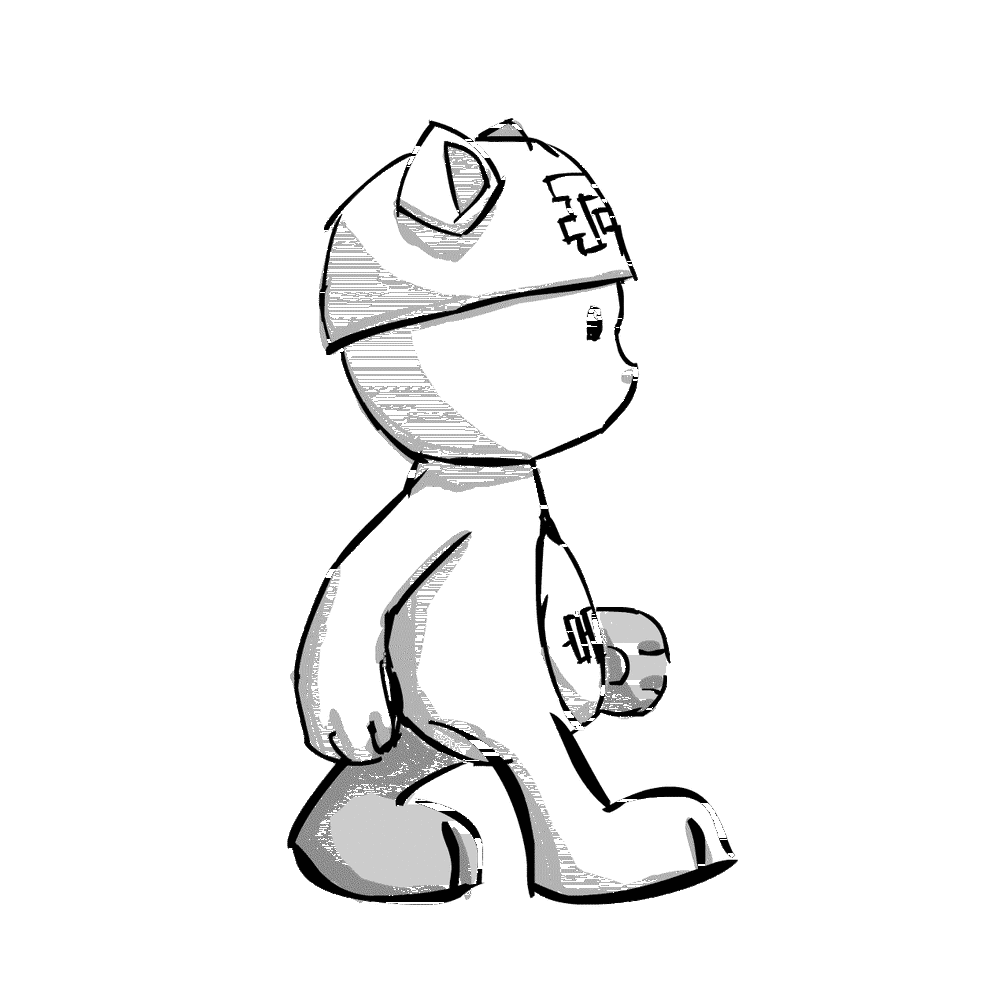
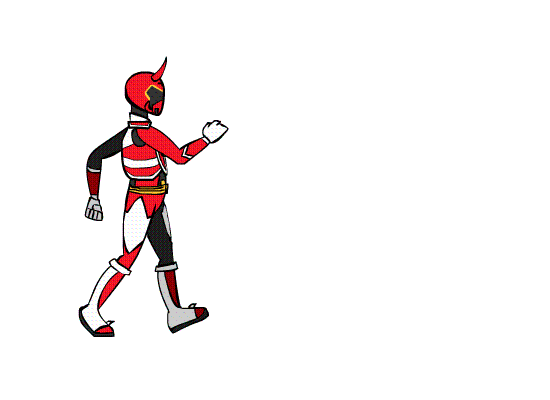
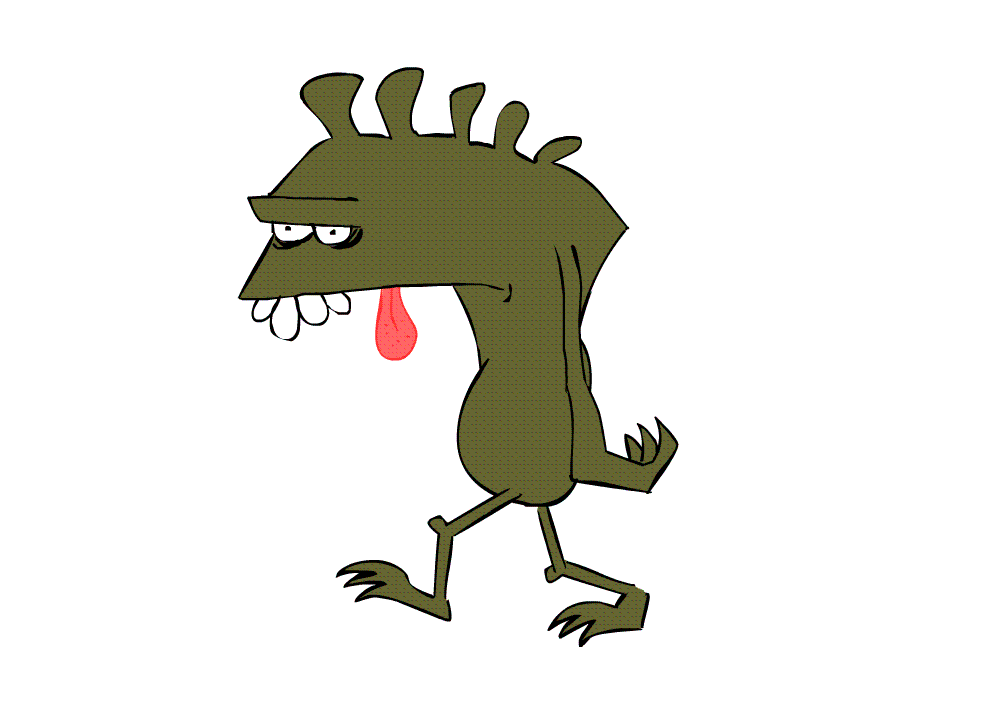
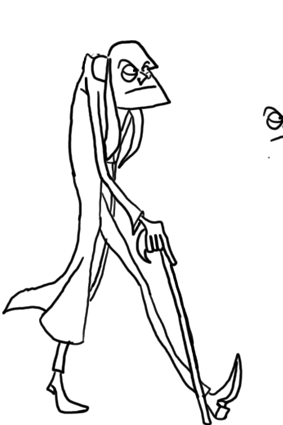
ANIMATION CHALLENGE 6: CHARACTER WALKING CYCLE
|
PROJECT LESSON LINK from ANGRY ANIMATOR
Walk Cycles are one of the most difficult tasks for an animator...because you have to understand the mechanics of motion and bring that across convincingly, but then - as if that wasn't enough? You must infuse a character and personality into that walk through your timing, spacing and poses. However difficult, though, if you can learn to master a walk cycle then you can animate just about anything. Many events are happening at the same time, and it can seem overwhelming. A single mistake on your first drawing can wreck the rest of the scene. However, the process can be broken down into a series of steps which can go some distance in simplifying the process. A walk cycle can be described by four distinct poses: Rinse-Lather-Repeat.... whoops I mean... CONTACT - RECOIL - PASSING - HIGHPOINT - repeat You can cover the cycle of a full stride in 8 frames. For your first practice walk cycle, it's best to try a stick figure. It's good practice, anyway, as a great way to build your animations is to start by drawing stick figures to get the motion down before building actual solid shapes on top of those stick figures; it can save you a lot of time, and a lot of correction work, as it's much easier to work out timelines and difficult motion issues in stick figures than in detailed forms. MECHANICS OF A WALK CYCLE: Walk cycles encapsulate all of the principles of animation. They also deal with complex issues of weight and timing, in order to be convincing. Offsets, Overlap and Follow Through on every joint are what will keep the motion natural and prevent it from looking robotic. TIMING AND PACING OF A WALK CYCLE: The timing or pacing of the walk can define the character and personality of the walk. Timing and Poses will define the weight and construction of your character and even add elements of character as well. CHARACTER, STATE OF MIND, AND PERSONALITY: Character and personality are what make the walk real and make the audience identify with it on an emotional level. Disney always said "the mind is the pilot" and that is where every motion you create must start. Before even drawing a pose, you need to establish in your mind where your character's head is at. Your final project result will be a strong example of a walking cycle using a character of your own creation. The walking cycle should have 8 poses, I will let you choose whether you want to draw in pencil/pen first, or draw directly into FLASH. |
|
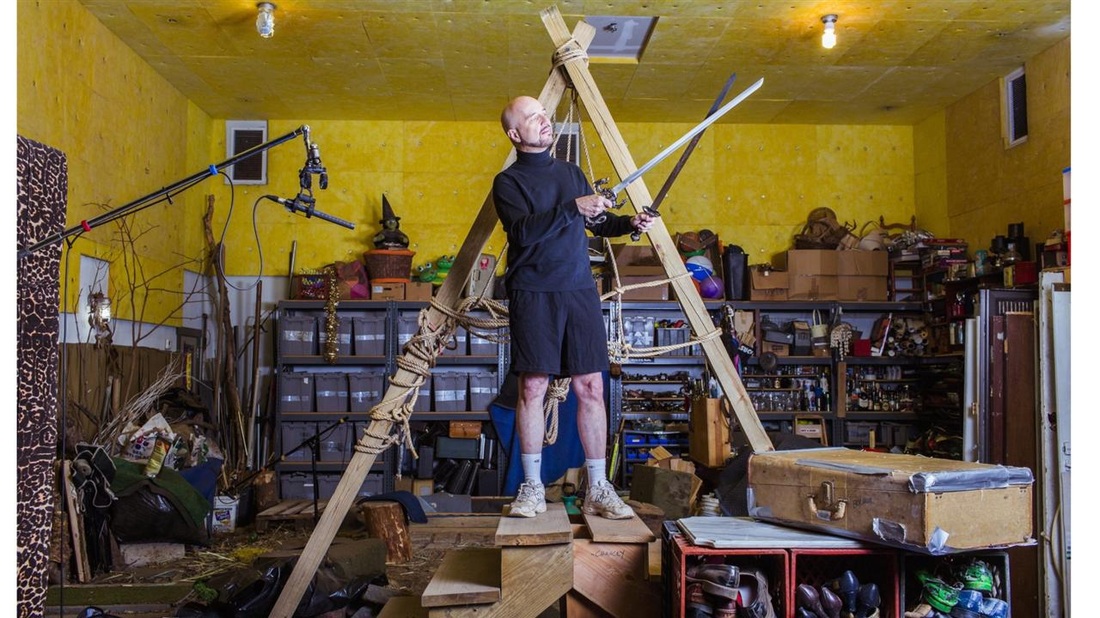
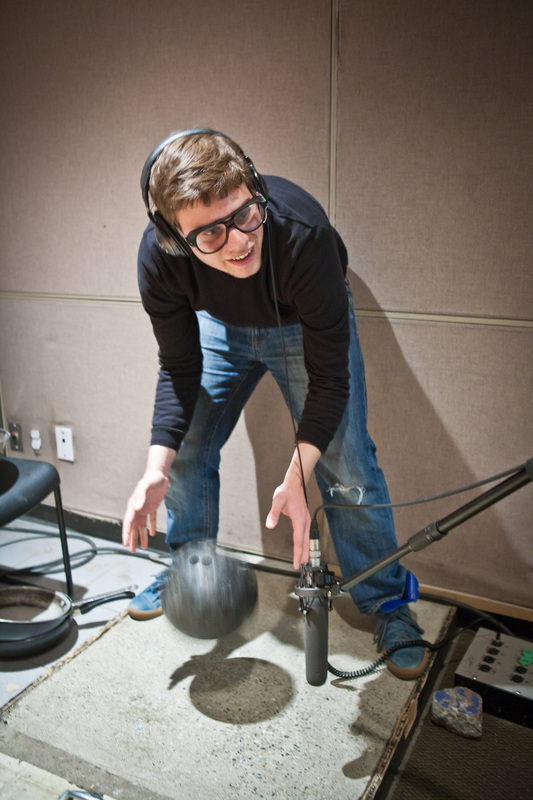
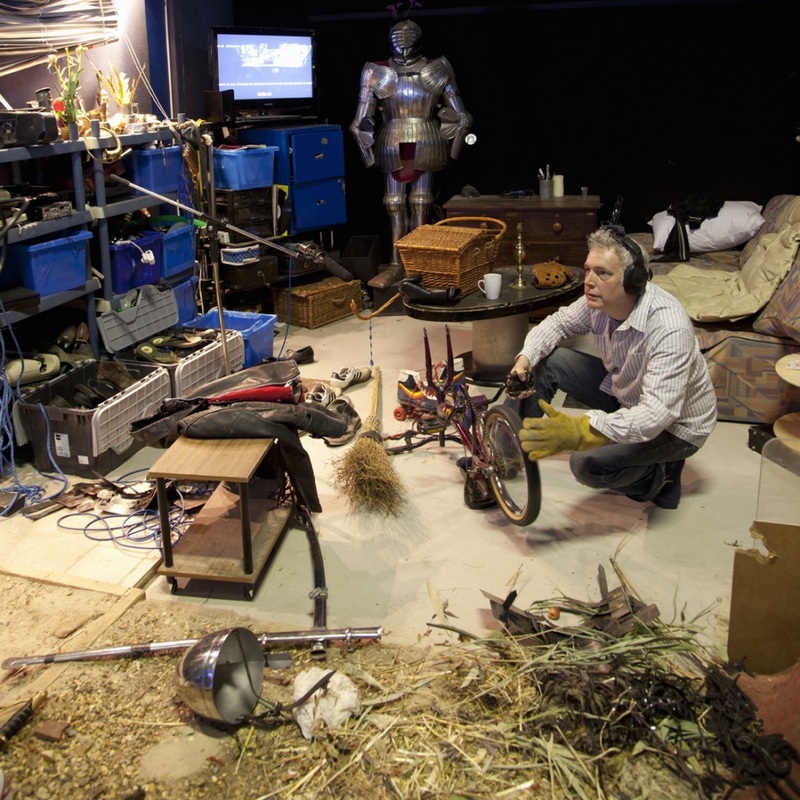
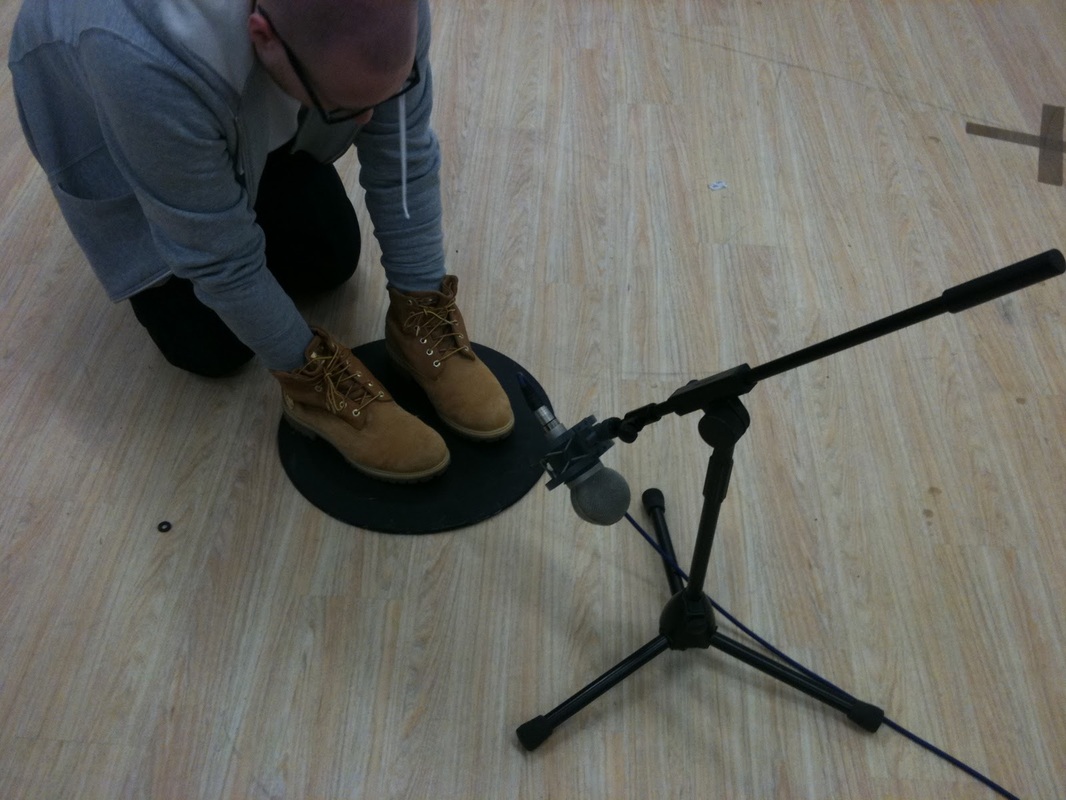
SOUND DESIGN
|
|
Sound design is the process of specifying, acquiring,
manipulating or generating audio elements. It is employed in a variety
of disciplines including filmmaking, television production, theatre, sound recording and reproduction, live performance, sound art, post-production, and video game
software development. Sound design most commonly involves the
manipulation of previously composed or recorded audio, such as sound
effects and dialogue. In some instances it may also involve the
composition or manipulation of audio to create a desired effect or mood.
A sound designer is one who practices the art of sound design.
When sound was introduced to motion pictures, initially it was seen as an inevitable reaction to the action on screen, something Sound Designer Walter Murch refers to as the Shadow of Sound. This idea mirrored real life where sound acts as a shadow to physical events. If you see a dog bark, you sure as hell expect to hear one. It’s physically impossible to disconnect the two events in the real world, just as you can never escape your shadow. |


OBJECTIVE
To recreate the sound design for an existing Animated feature movie trailer. You and a partner will delete the the existing sound and play in your own choice of musical scores, sound effects, voice overs, and dialogue. A successful project will make the viewer believe that they are watching and taking in a professional creation.
GUIDELINES
- Take an existing MOVIE/ANIMATION CLIP/GAME TRAILER and redo the entire sound design
- Sound bytes can be downloaded on your own or taken from the digital sound collections provided
- Minimum of 3 sound effects must be created and recorded on your own
- Make sure the movie trailer sound is full and does not have lots of empty portions, as professional as you can make it
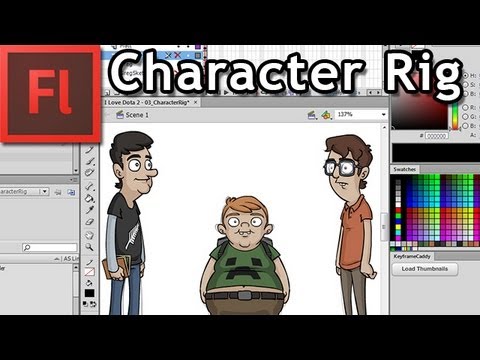
CHARACTER RIGGING- FLASH
|
|
In this part of the course, we'll take a hand-drawn cartoon character…and convert him into a fully rigged and vectorized Flash puppet ready to be animated.…We're going to use the basic Flash drawing tools and find out how to name…and layer the symbols.
We will work on the process of character animation in Flash, using nested symbols and motion and shape tweening to create believable characters. The course covers the process from start to finish, from rigging a character to creating a walk cycle animation. Topics include:
|


|
|
|
